Silverstack offers a solution to export clips to DaVinci Resolve including clip metadata as well as ASC-CDL color metadata. Additionally it is possible to set up Resolve with the according LUTs to reflect the exact node based color processing done in Silverstack.
How to Transfer Clips from Silverstack to a DaVinci Resolve Timeline
For transferring a bin from Silverstack to a Resolve timeline, including clip and color metadata, these steps are necessary:
- Export FCPXML as well as additional clip and color metadata from Silverstack
- Import FCPXML into DaVinci Resolve
- Use the CSV import function in DaVinci Resolve to add clip metadata
- Use the Colortrace function in Resolve to add ASC-CDL color data
Export FCPXML and Additional Clip and Color Metadata from Silverstack
To export to Resolve select the desired bin from the Silverstack Library. Either perform a secondary (right) click on the bin and select “Export to > Davinci Resolve Export” or from the “Export” button in the title bar of Silverstack choose “DaVinci Resolve Export”.
You will be presented with a window where you can select or deselect clips from the bin that should be exported:
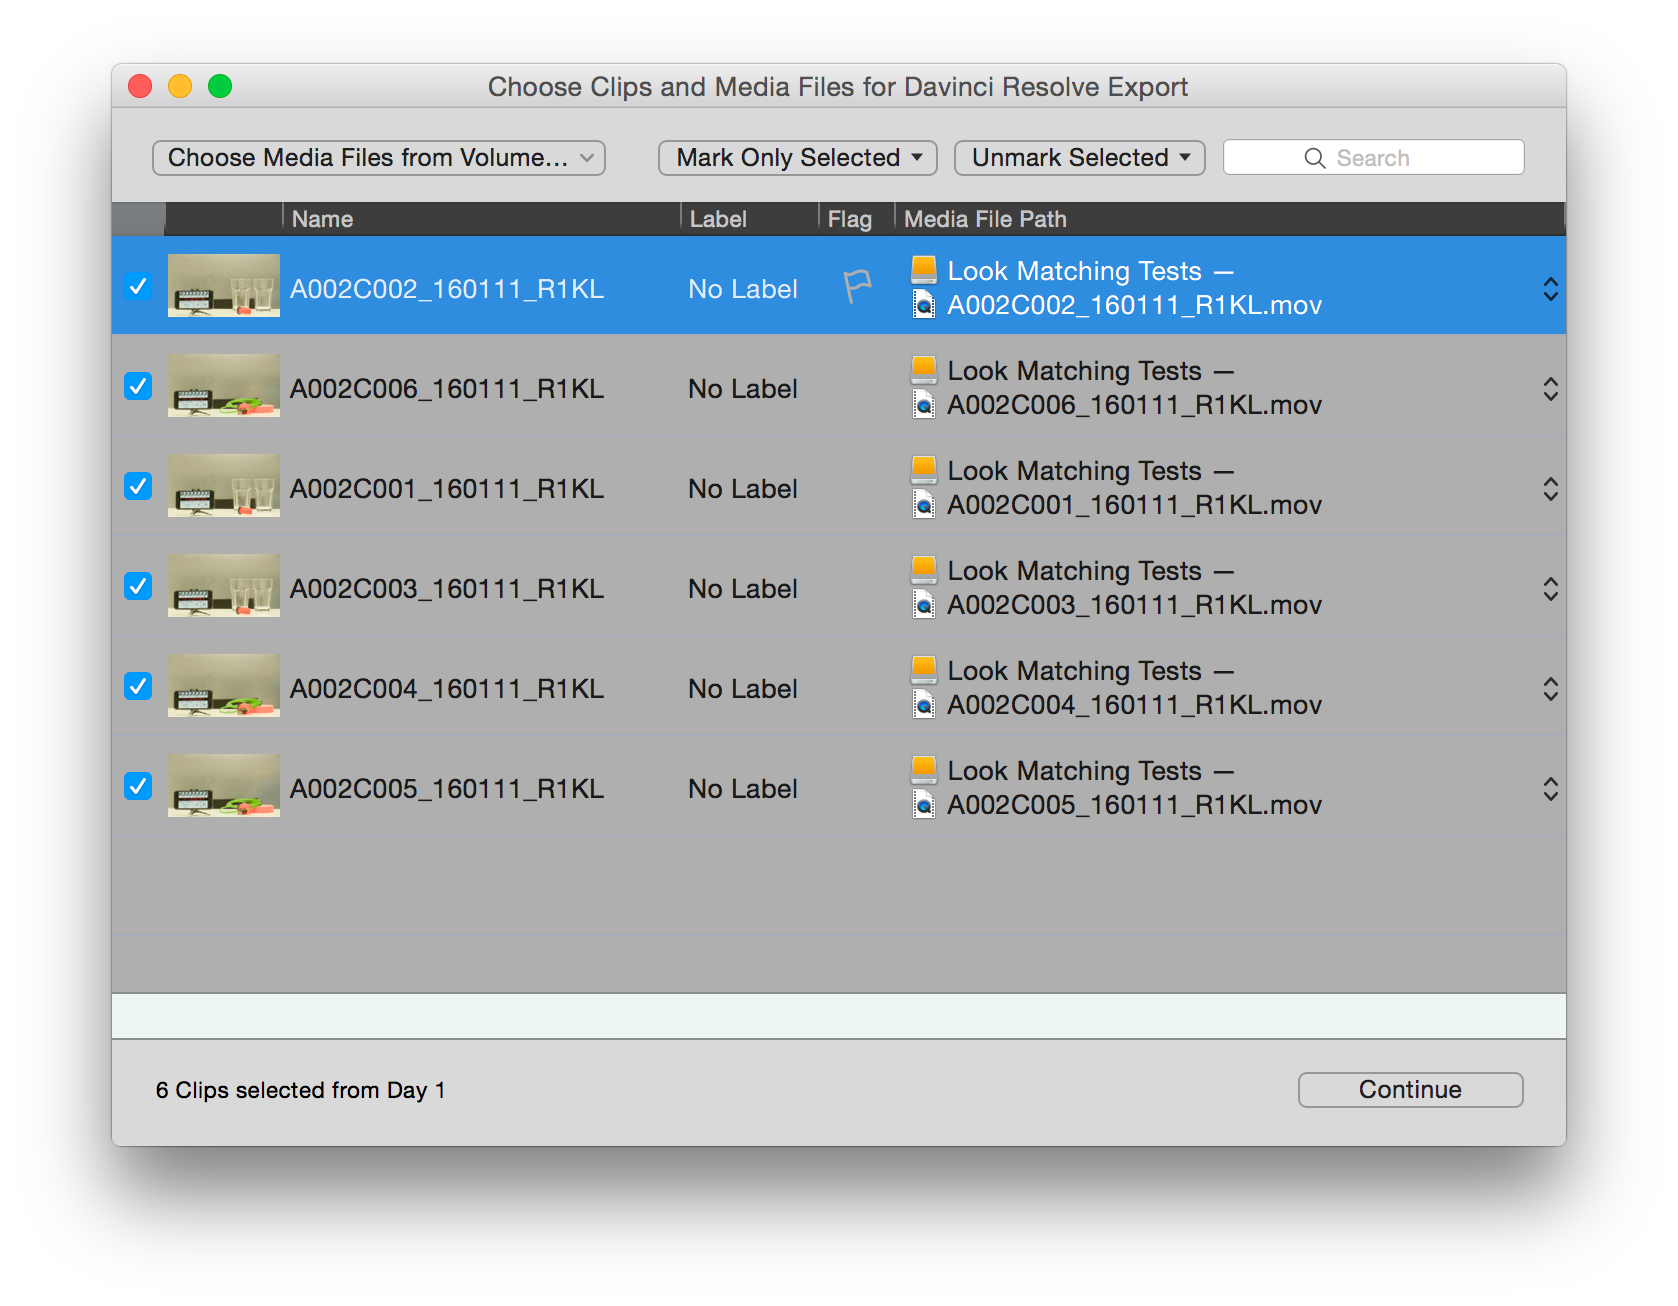
Figure 1: Choose clips and media files for Davinci Resolve export
After making your selection click “Continue”.
A further dialog window opens up:

Figure 2: Davinci Resolve export options
It lets you choose from three export options :
- Timeline (.fcpxml): This export item is responsible for creating the timeline and populating the clips in Resolve.
- Color metadata/Looks (.edl and .ccc): These export items are responsible for adding the color metadata (ASC-CDL settings) to the clips in Resolve (via Colortrace functionality).
- Clip metadata (.csv): This export item is responsible for adding the clip metadata to the clips in Resolve. It includes the option to configure data set in column “Reel Name” (Reel Name, Clip Name or Source File Name).
To result with a timeline, clip and color metadata activate all three checkboxes and click “Export…”. Select the desired destination for the files. The FCPXML, EDL, CCC and CSV file will be put in the same directory automatically.
Import FCPXML into DaVinci Resolve
Open up DaVinci Resolve and create a new project.
From the Main Menu choose “File > Import > Timeline…”. Navigate to the path where you saved the FCPXML from Silverstack select it and click open.
You will be presented with an option window for loading XMLs:

Figure 3: Preferences for loading an XML in DaVince Resolve
Check to have the checkbox “Automatically set project settings” enabled which should be the case by default. That makes sure all settings will be adapted to match the clips from the FCPXML.
Click “Ok”.

Figure 4: The main window of Resolve with the imported timeline
You should be presented with the “Edit” tab in Resolve that shows the Media Pool on the left and a timeline containing all the clips from the Silverstack bin you formerly exported.
How to Add Clip Metadata to the Clips in the Timeline
This process will only work in Resolve 12.5 or later.
Go to the “Edit” tab in Resolve. From the Main Menu choose “File > Import metadata to… > Media Pool”:

Figure 5: Import metadata from the csv
In the following opening dialog choose the .csv file that you exported from Silverstack and click open.
A metadata import window will follow:

Figure 6: Metadata import options
Choose a meaningful combination of Import Options and Merge Options for your use case. Hit “Ok”.
All matching clips in the bin should now have received the new metadata. Select a clip and check the metadata section on the right side of the Resolve window for the results.
The FCPXML will already transfer a basic set of metadata. The additional metadata that can be transferred from Silverstack via the .csv file is in detail :
- Camera ID [Camera #]
- Scene [Scene]
- Shot [Shot]
- Take [Take]
- Episode [Episode Name]
- Label [Clip Color]
- Flagged [Good Take]
- Comment [Comments]
- Caption [Description]
- Custom 1 [Lens Notes]
- Custom 2 [Audio Notes]
- Custom 3 [VFX Notes]
- Tags [Keywords]
- Shot Descriptors [Shot Type]
- Cue Points [Reviewers Notes]
- Shutter [Shutter]
- ASA/ISO [ISO]
- White Balance [White Point (Kelvin)]
- Tint [White Balance Tint]
- LUT Nodes [LUT Used]
- CDL SOP [CDL SOP]
- CDL SAT [CDL SAT]
- Director [Director]
- Cinematographer [DOP]
- Production [Production Name]
- Producer [Producer]
- Camera Assistant [Camera Assistant]
- 2nd Camera Assistant [2nd Asst]
- Data Manager [Data Wrangler]
- DIT [Digital Technician]
- Script Supervisor [Script Supervisor]
- Sound Mixer [Sound Mixer]
- Location [Location]
- Shooting Day [Shoot Day]
- Lens Model [Lens Type]
- Lens Serial [Lens Number]
- T-Stop [Camera Aperture]
- Focus Distance [Distance]
- Filter [Filter]
- ND Filter [ND Filter]
- Color Space [Color Space Notes]
- Camera Orientation [Angle]
- Camera Model [Camera Type]
- Camera Manufacturer [Camera Manufacturer]
- Camera Serial [Camera Serial #]
- Camera Firmware Version [Camera Firmware]
- External Audio Clips [Audio Media]
- Soundroll [Sound Roll #]
- TC Start (Ext Audio) [Audio Start TC]
- TC End (Ext Audio) [Audio End TC]
- External Audio Track Names (multiples in column “Audio Track Names”) [Track 1 to Track 8]
The labels in the brackets reflect the naming of the Resolve metadata fields the Silverstack metadata is mapped to.
Setting the Reel Name
To attain a proper match of the CDL values per clip you have to make sure that the Reel Names of the clips and the Reel Names in the Silverstack EDL match.
In the Project Settings go to “General Options” and inside of that to “Conform Options”. Make sure to check “Assist using reel names from the:” checkbox:

Figure 7: Set the Project Settings Conform Options for the right reel name handling for Color Trace matching
Based on your clip types as well as path structure and clip file names the settings that match your workflow could differ.
Selecting “Embedding in Source clip file” as an option should work for QT ProRes and ARRIRAW workflows.
Search the DaVinci Resolve manual for “extraction pattern operators” to learn how to use extraction patterns to pull reel names from your media paths.
Please be aware that the ColorTrace matching wizard will also give you the opportunity to “Ignore Reel Names” (see also Fig. 9) .
How to Add Color Metadata to the Clips in the Timeline
Use the Colortrace Function to add ASC-CDL color metadata.
After creating the timeline you will be able to add the color information.
Select the timeline from the media pool. It should be marked with a little XML indicator on its lefthand side. Perform a secondary (right) click on it and choose “Timelines > ColorTrace > ColorTrace from CDL” from the context menu:

Figure 8: Select ColorTrace from CDL
You will be presented with an open dialog where you will first have to choose the exported EDL file. Right after that you will have to choose the exported CCC file.
After opening both of them you will be presented with the ColorTrace option window:
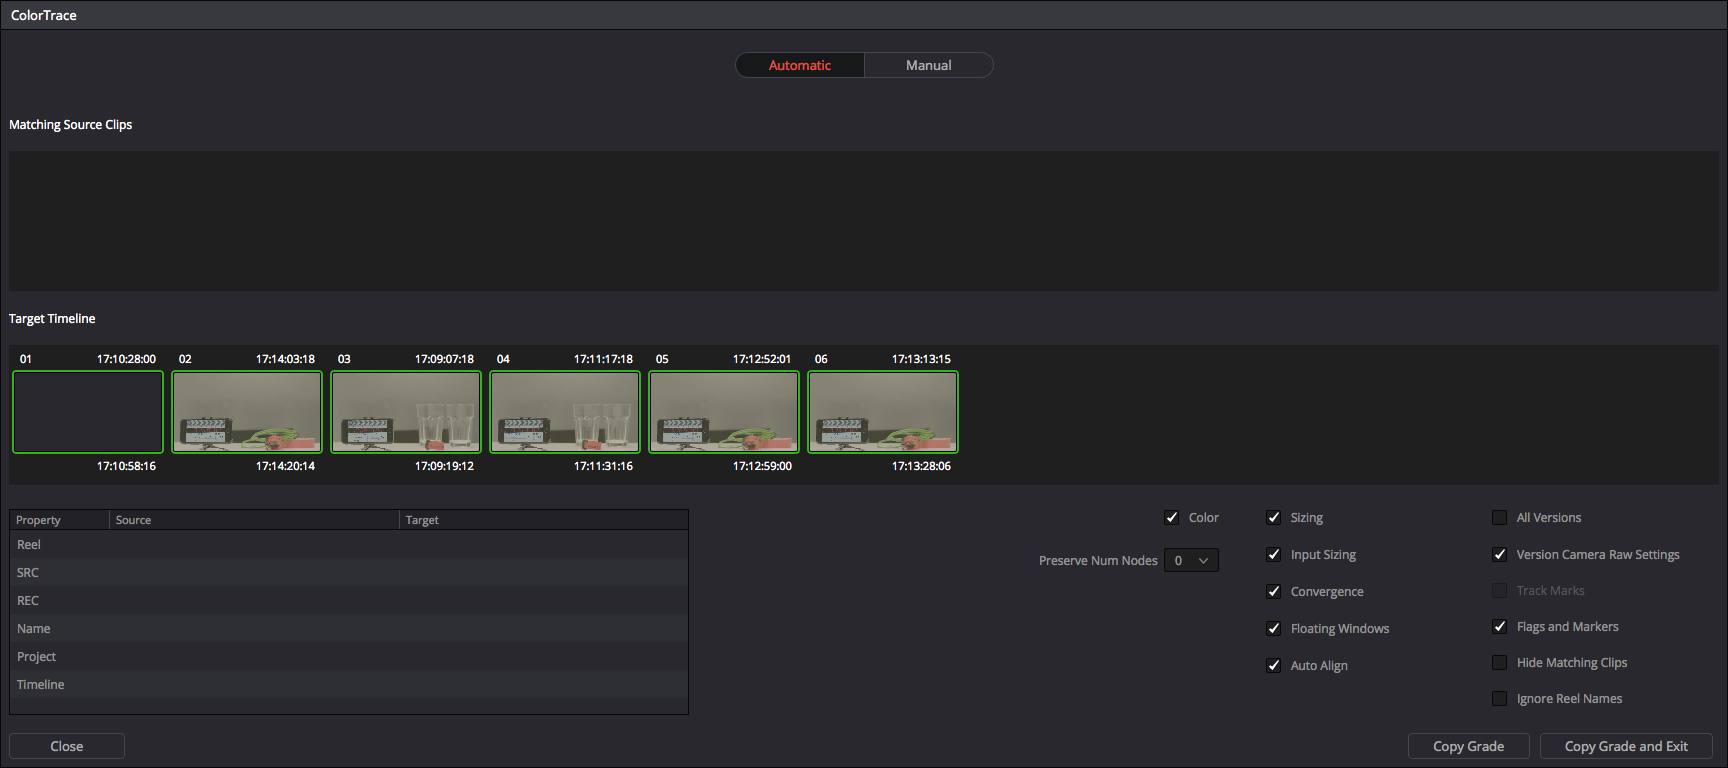
Figure 9: The ColorTrace option window
If all the clips have green borders everything matches fine. Click “Copy Grade and Exit” to copy the according grades to the clips. This is important as you can also “Copy Grade and Exit” without applying any look if all of the clips are marked with a red border.
You can check the “Ignore Reel Names” box to make sure that the Reel Name is not taken into account. Please see the section about setting the Reel Name above to be able to handle multiple reels in parallel with distinct Reel Names.
Switching to the Color tab presents you with the clips that now have the ASC-CDL color metadata from Silverstack added:
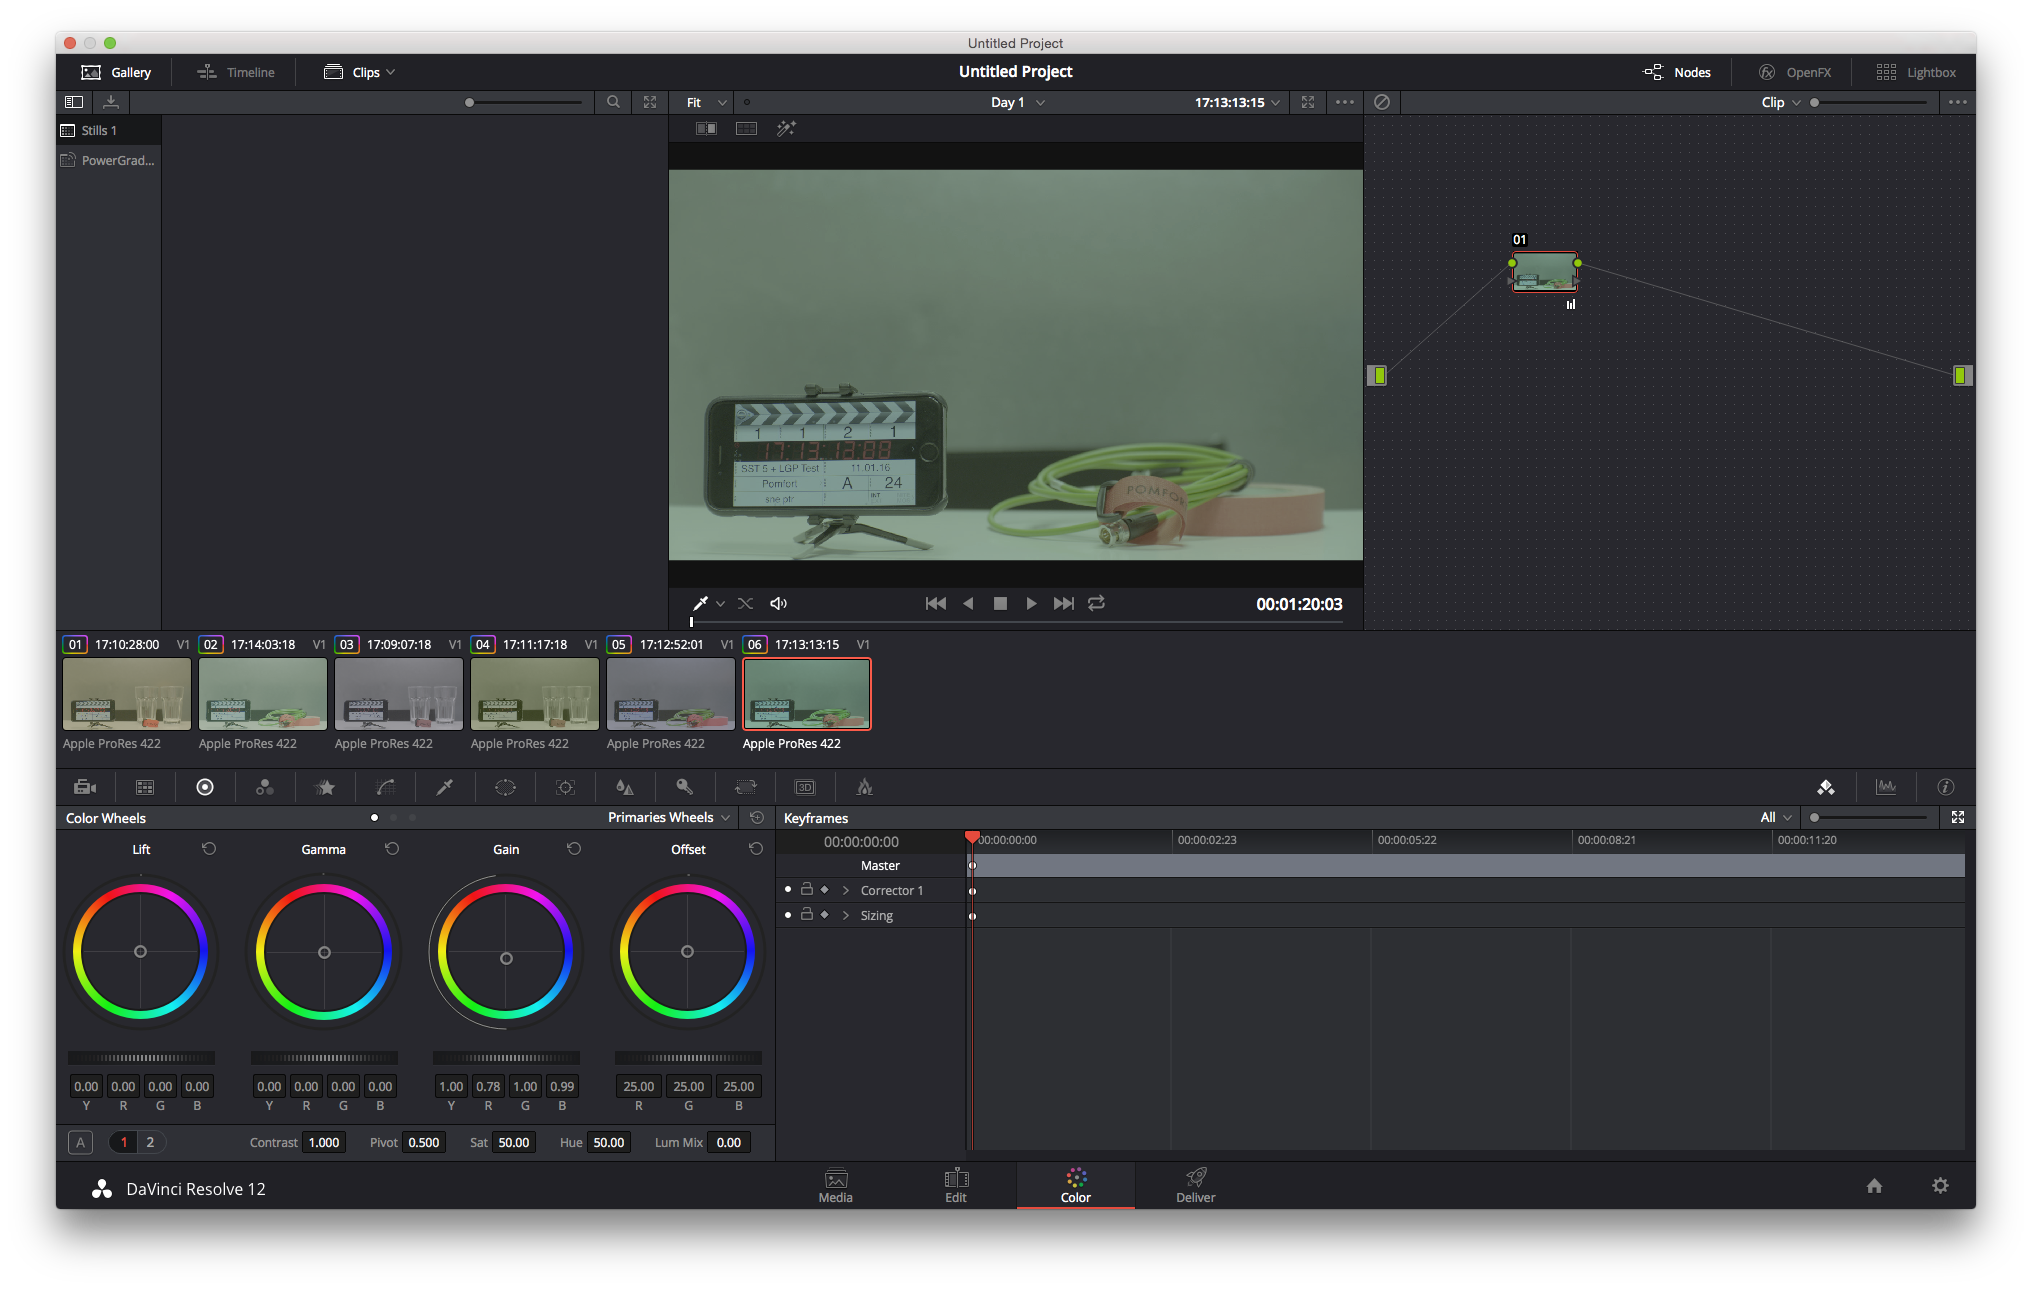
Figure 10: Switch to the color tab to see the clips with added color metadata