This article covers features which are only available in Silverstack Lab.
Overview
In a scenario where audio is recorded separately of the image it is common to use a collective timecode to later sync the audio clips to the video clips. Silverstack Lab enables you to perform this automatic sync operation. Therefore the following steps have to be executed:
- Ingest the video clips and the audio clips separately into Silverstack Lab
- Open the “Audio Sync” wizard to start the sync process
- Open the player and audio panel to playback clips with audio that has been connected to the video clips
Getting Video Clips and Audio Clips into Silverstack
Please refer to the article Parallel Offloading to learn how to offload media in Silverstack. Alternatively you can read Adding Clips to the Library (Ingest without Copy) if you only want to register footage and audio.
It is important to register the audio Broadcast Wave files separately from the video files into a separate bin. When you ingest a folder containing audio files Silverstack Lab will automatically detect the format:
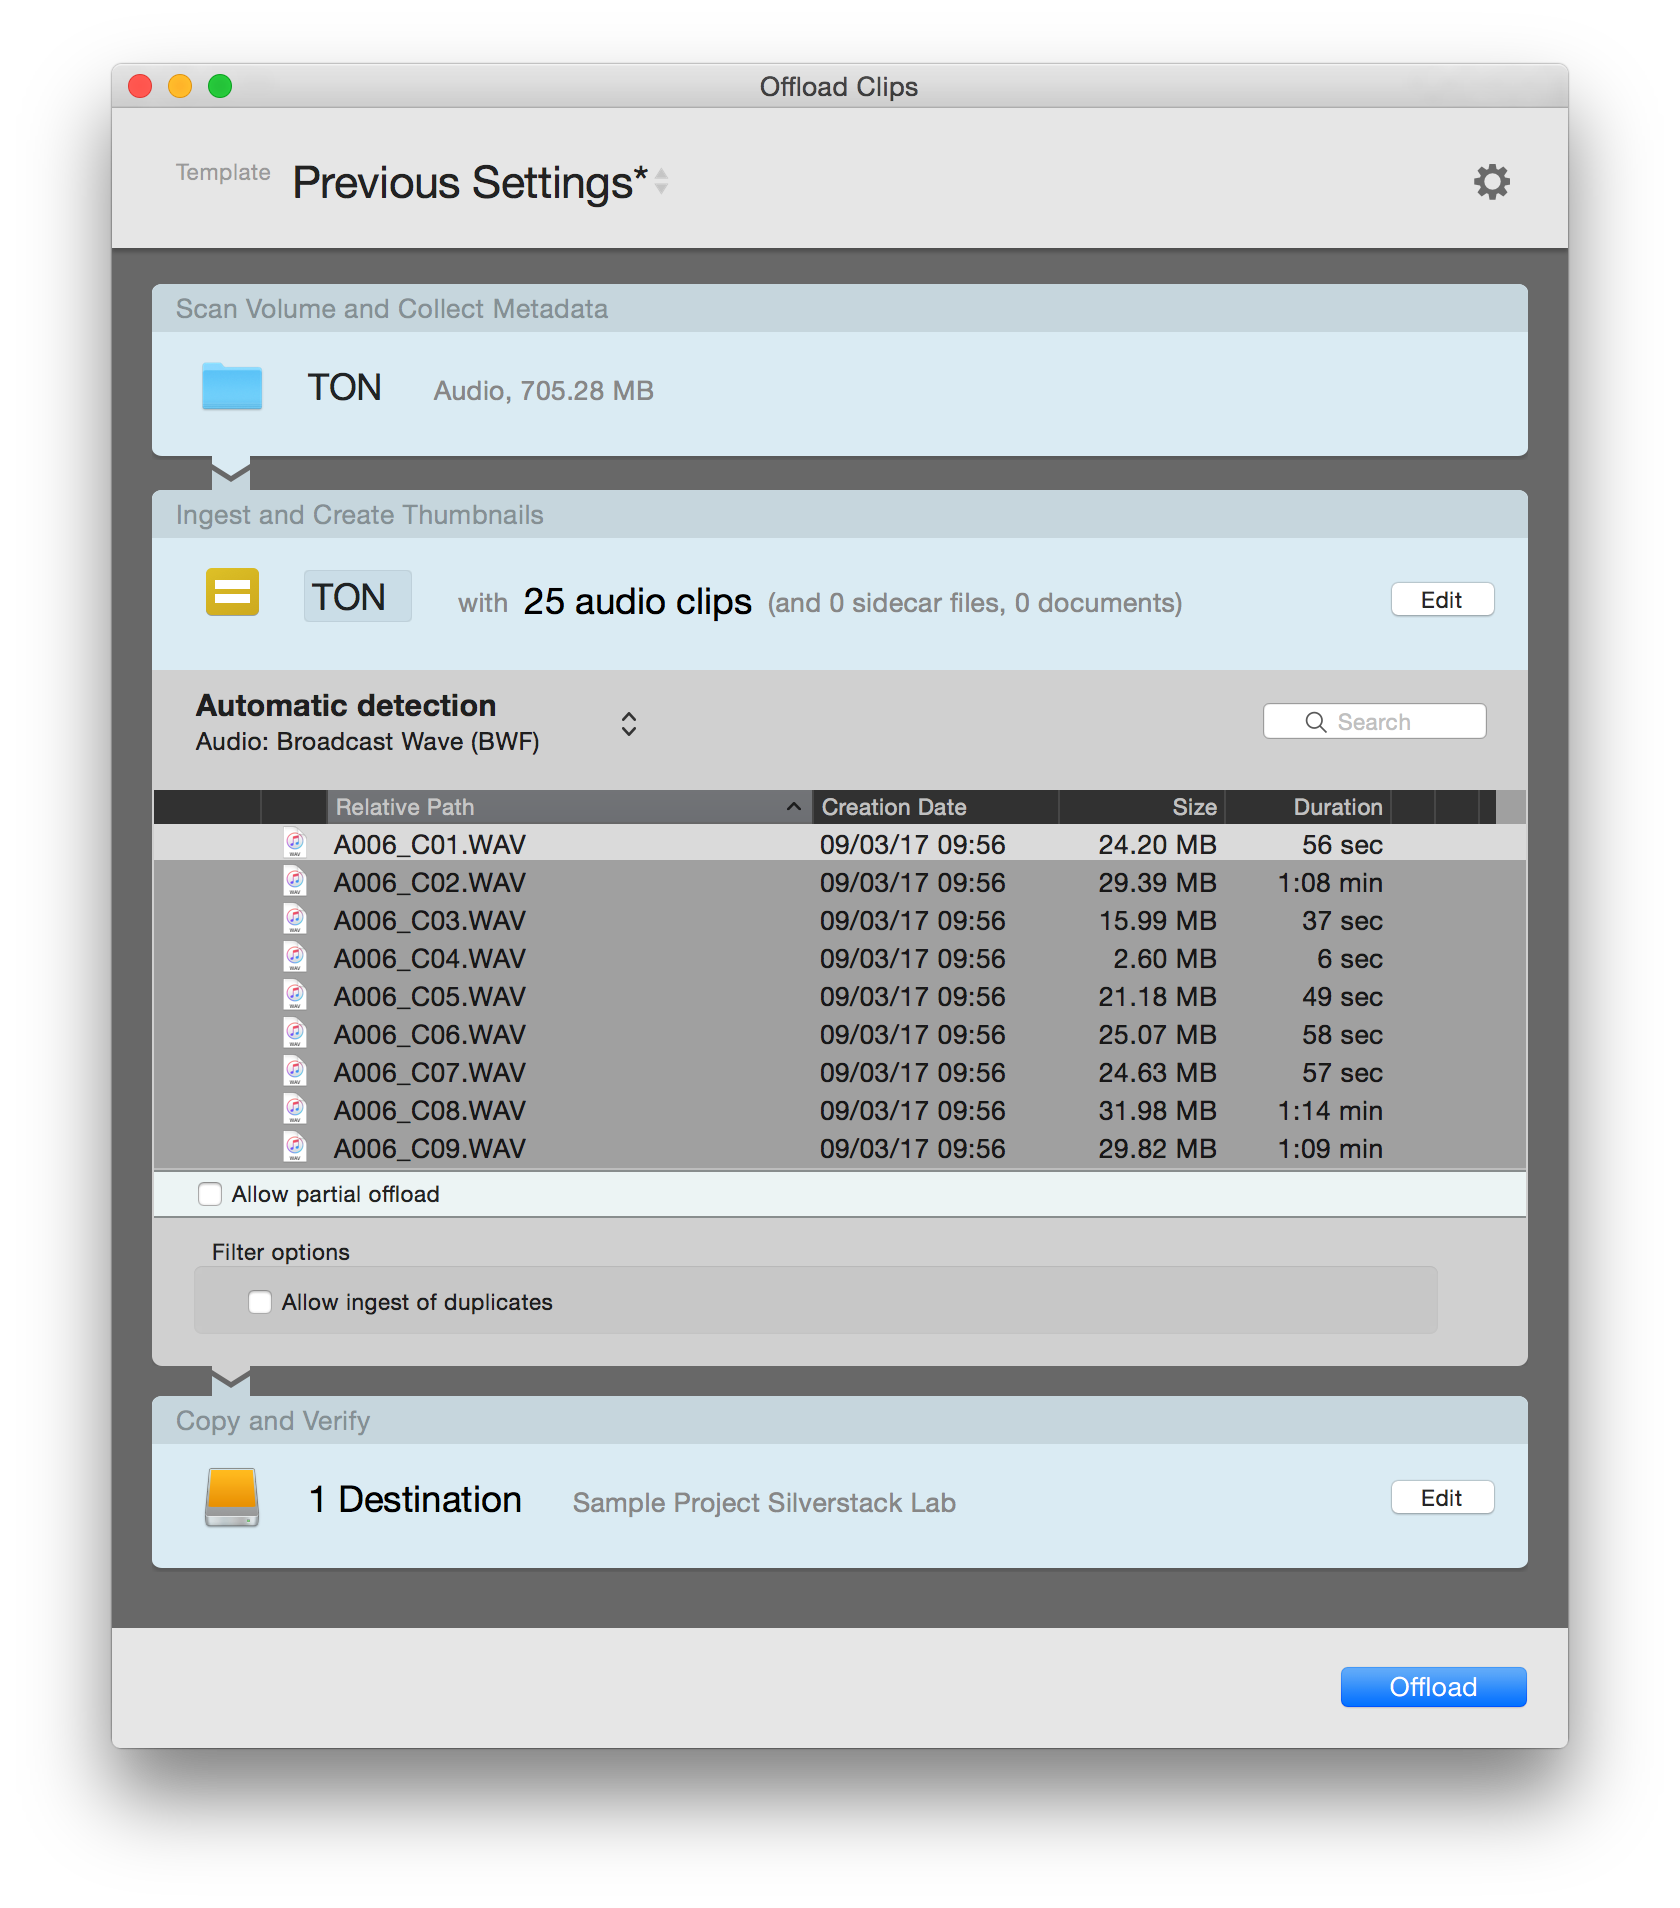
Fig. 1: Automatic detection of audio files in the offload wizard
Please refer to the article Audio Clips in Silverstack to learn more about the handling of audio in Silverstack.
After registering your video clips and the according audio files your library should look similar to this:
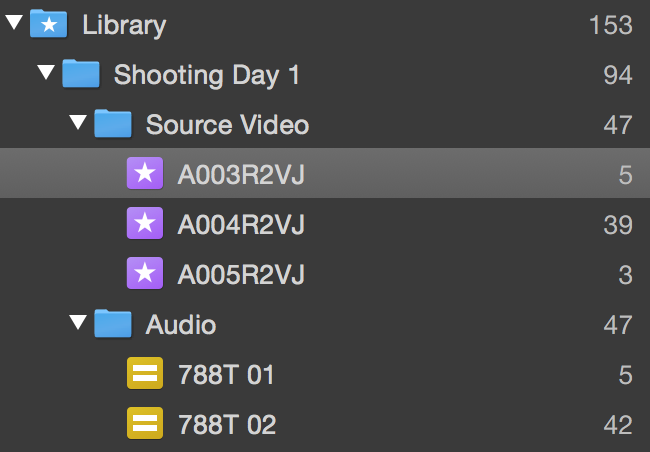
Fig. 2: A library structure with video and audio bins
Automatic Audio Sync
Select the video bin or folder you want to sync audio clips to.
Access the audio panel that shows in the lower center of the interface either by clicking the “Audio&Color” button in the toolbar or by going to the “QC” UI Layout:

Fig. 3: Access the Audio&Color panel
Now start the audio sync wizard. You can do that by clicking on the “Sync Audio…” button in the header bar of the audio panel:

Fig. 4: The “Sync Audio” button
Alternatively you can access the audio sync wizard from the “Media” button in the toolbar or the context menu of a bin or a selection of bins.
In the upper section of the audio sync wizard you can choose the location of your audio that should be synced with the video:
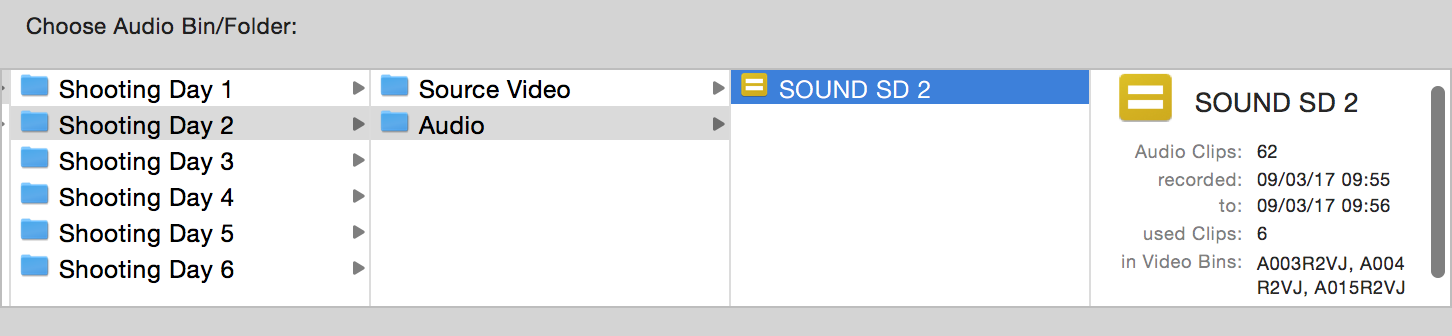
Fig. 5: Select the right audio bin according to your video bin
The wizard will now show you the video clips on the left side and the according audio clips on the right side:

Fig. 6: The audio sync wizard shows the matching video and audio clips
The wizard shows two checkboxes which grant you the following options:
- The enablement of the checkbox “Hide already synced video clips” will exclude all video clips from the display in the list view that already have external audio. If the checkbox is disabled the video clips that already have external audio attached will be shown in red letters.
- The checkbox “Replace Slate Info of synced Video Clips with Slate Info from Audio Clips” will take over the slate info from the metadata of the audio clips to the video clips. That includes scene, shot and take information.
In case of an error the audio sync wizard gives you detailed information about the status of all involved media in the “Learn More…” panel. Click the “Learn More…” button at the right end of the information stripe to access the details:

Fig. 7: Audio sync wizard with non matching items and the “Learn More..” panel opened
The window defines in detail:
- All video clips that do not sync to any audio clip
- All selected audio clips that do not sync with a video clip
- All video and audio clips that have duplicate matches
After completing the process go ahead and click “Sync” to execute the audio sync as displayed in the wizard.
Completed Sync and Review of External Audio in the Audio Panel
After the sync is executed the external audio clips appear in the audio panel in the lower center of the user interface:
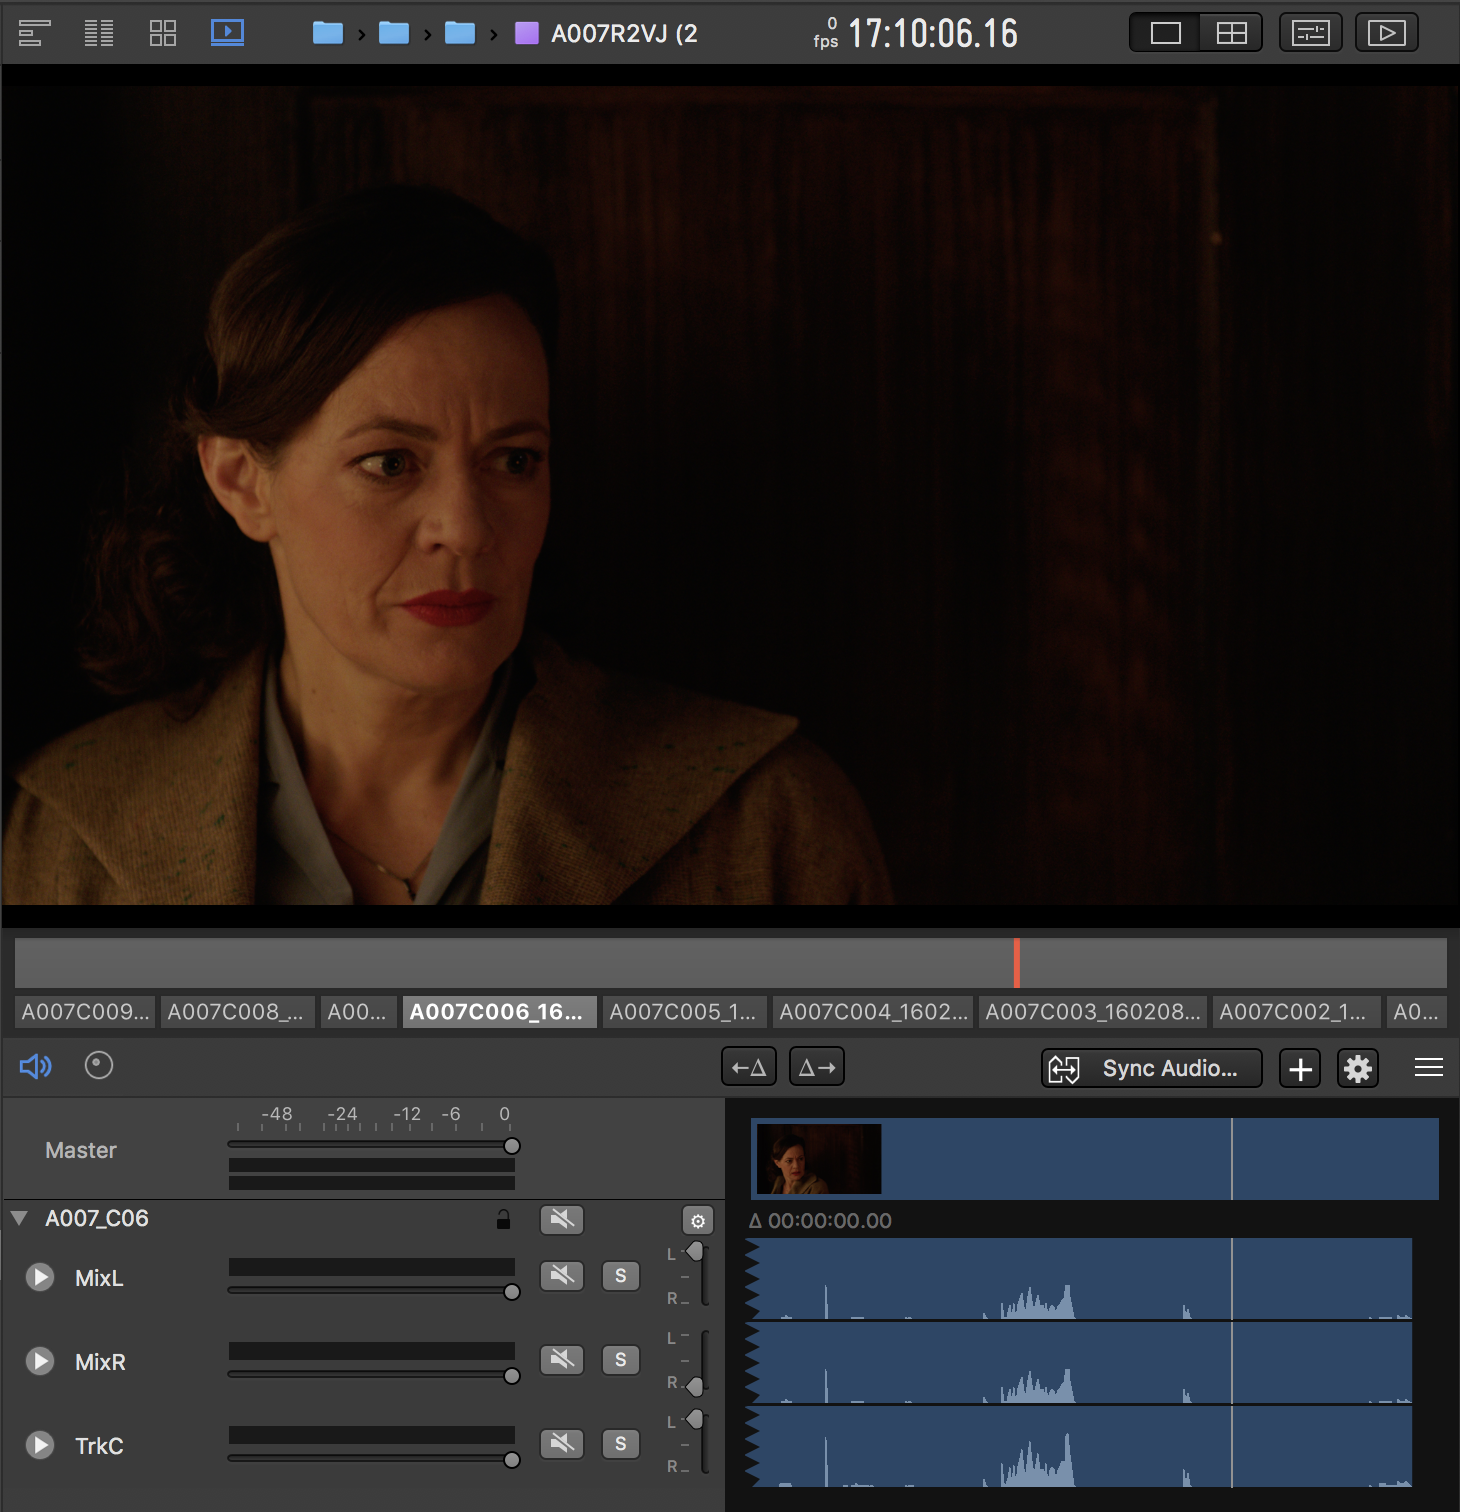
Fig. 8: Player and opened audio panel with external audio
You will be able to check the sync by playing back the video clip in the player.
Audio Details & Options
After you’re done with the audio sync process the global audio clip options in the audio panel enable you to:
- Reveal Audio Details: The audio details panel for external track allows to zoom into the waveform for a visual sync check.
- Slip Audio: Slip external audio tracks to adapt for audio/video offsets.
- Re-Sync Audio: Re-sync single audio clips or all audio clips in a bin again.
- Transfer “Audio TC offsets”: Transfer Audio TC Offsets to other timecode-synced audio clips. The “Audio TC offsets” describe the offset of an external audio clip to its TC synced position.
- Lock Audio Tracks: Lock single audio clips to save them from being altered.
- Transfer Mix Settings: Apply a mix to all audio clips in a bin.
- Remove External Tracks: remove single external audio clips or all external audio clips in a bin or selection.
Here’s an overview of the audio panel and where to find the most important functionalities:
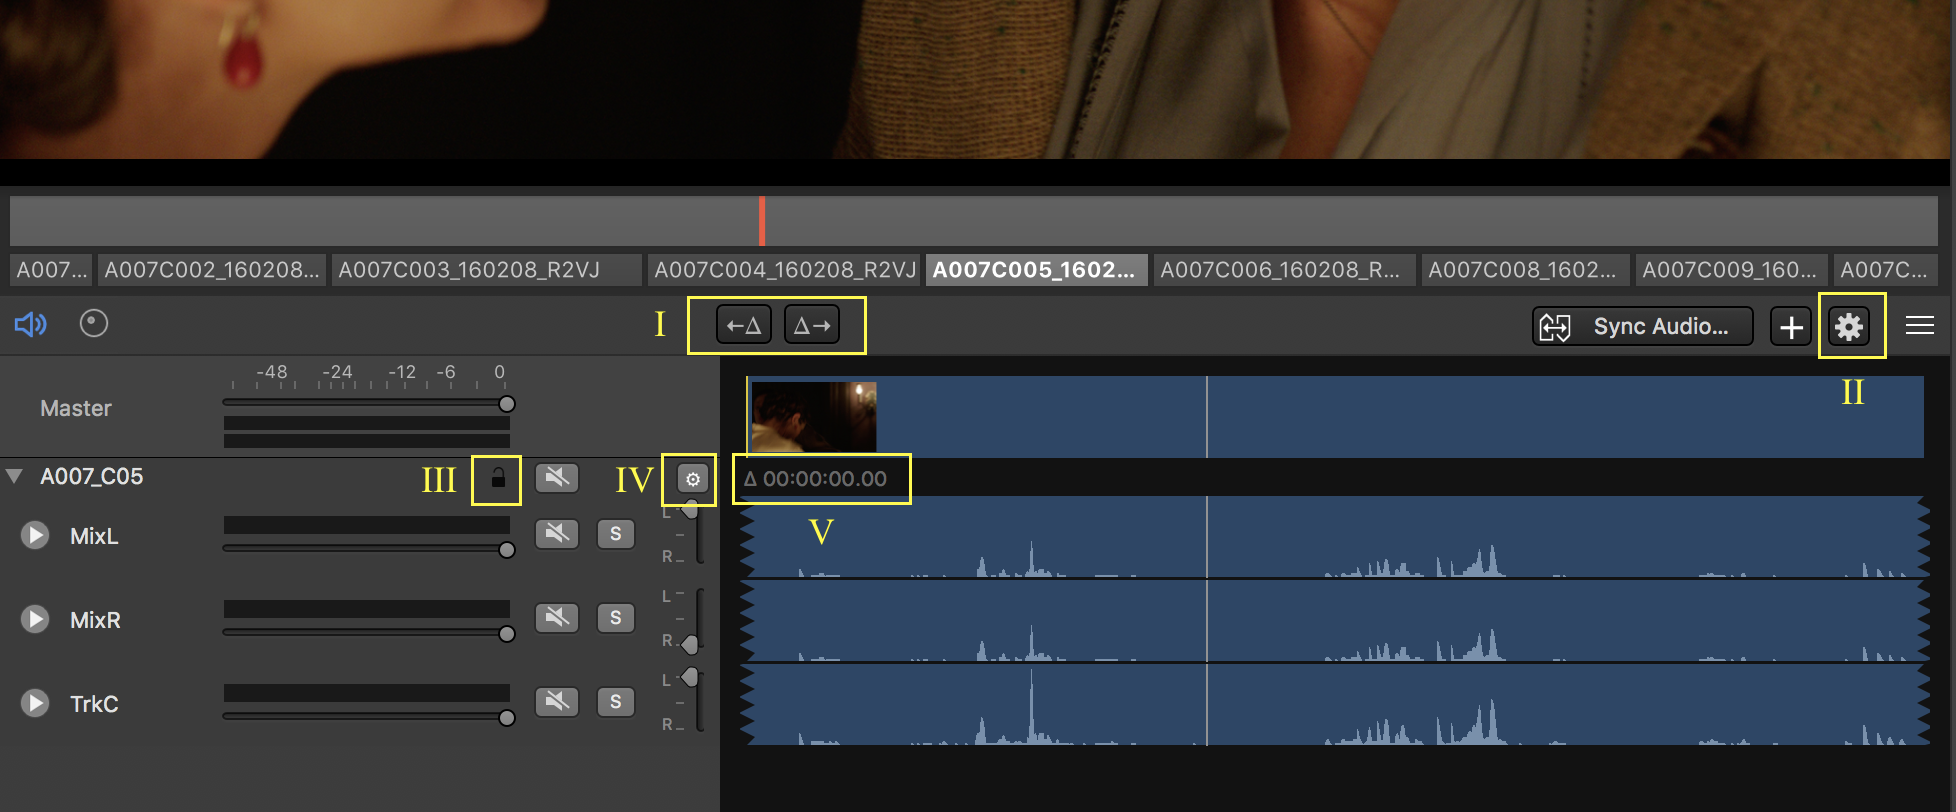
Fig. 9: Global Audio Clip Options
Here are the details for the different functionalities:
Audio Details with Waveform Zoom
You can open the audio details with the “Audio Details” button in the toolbar of the audio panel.
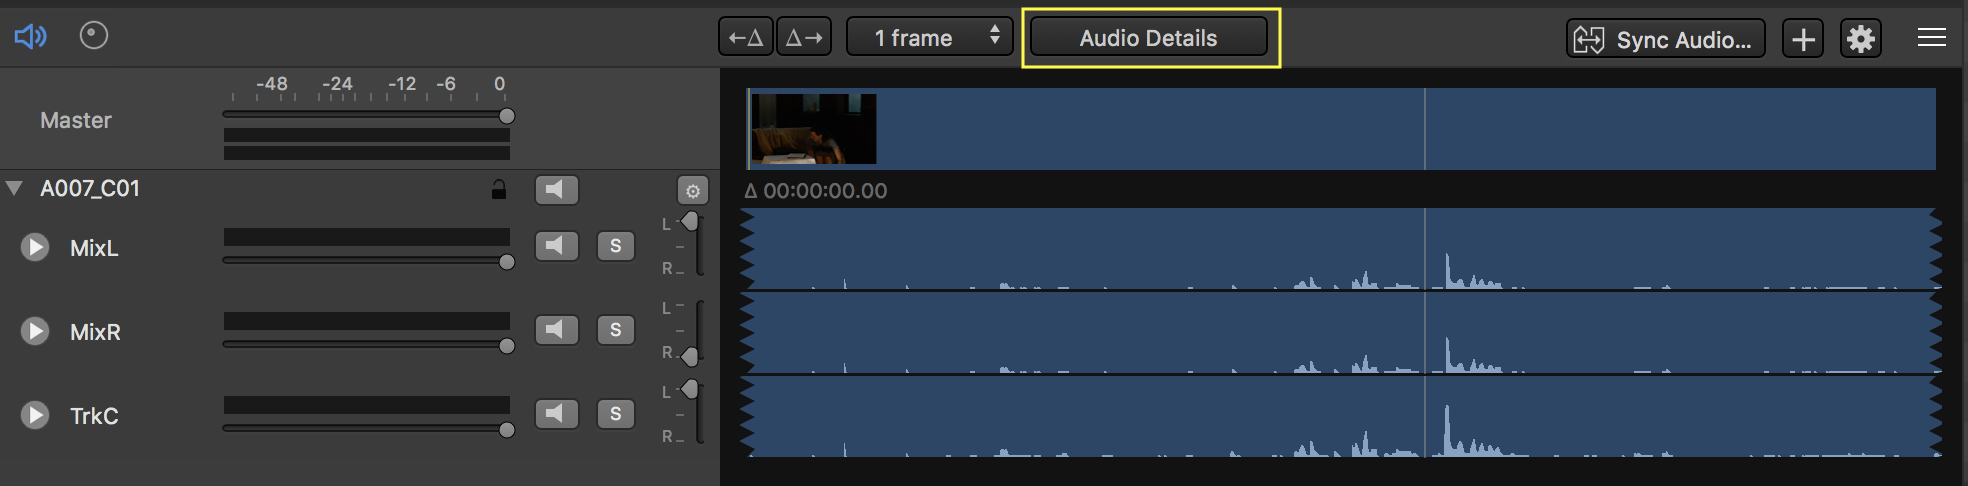
It reveals the audio details panel:
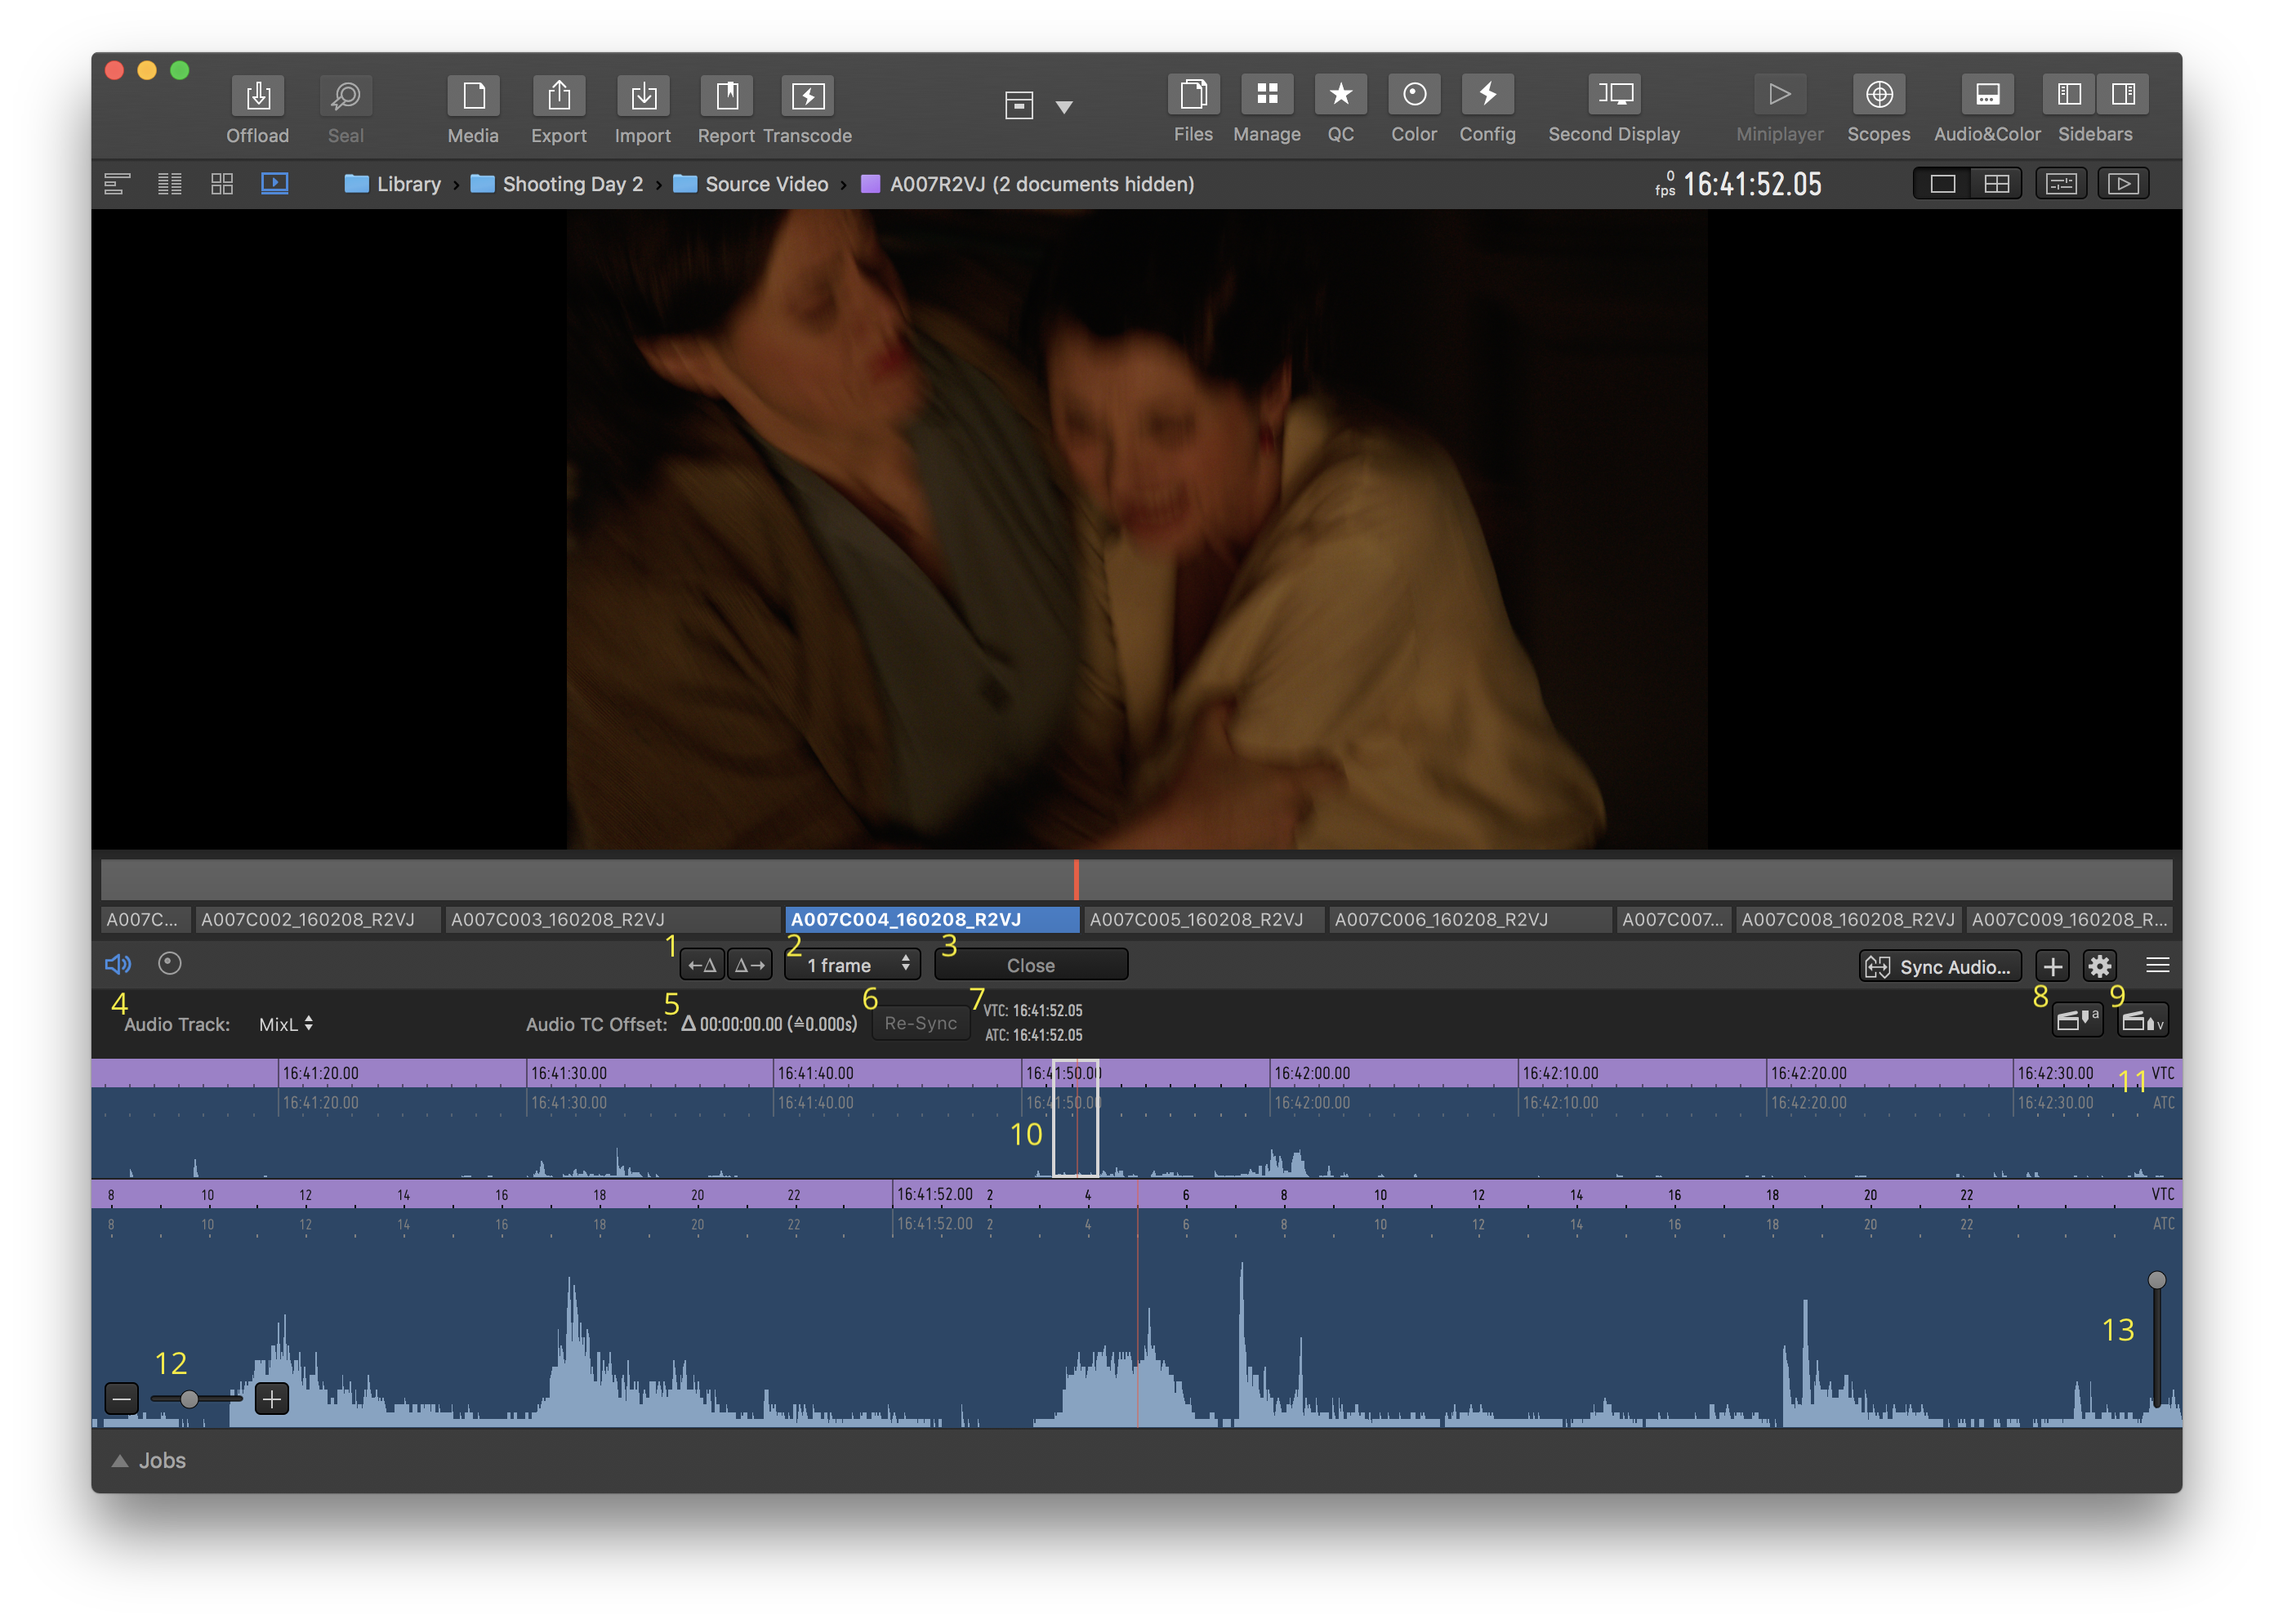
It offers the following functionalities and controls (see screenshot above for references):
- Slip buttons: The slip buttons allow to slip audio to the left or right relative to the video to compensate for audio offsets.
- Frame selection for audio slip: You can select the amount of frames to slip from the dropdown. It will affect the slip quantity when pressing the slip buttons.
- Audio Details/Close: Reveals and conceals the audio details
- Audio Track: Select the audio track to be displayed from the pop up menu
- Audio TC Offset: Specified the offset between the identical audio and video timecode. The offset is displayed in TC and its equivalent in seconds.
- Re-Sync: Click the re-sync button to re-sync audio and video by timecode. By its nature this resets the Audio TC Offset.
- VTC and ATC: Shows the current Video TC (VTC) and Audio TC (ATC) at the current frame position.
- Set Audio Slate Marker: Sets an audio slate marker at the current playhead position to manually sync audio and video based on slate positions.
- Set Video Slate Marker: Sets a video slate marker at the current playhead position to manually sync audio and video based on slate positions.
- Detail Area and Playhead: The white rectangle shows the zoomed waveform below covers.
- Timeline Rulers Video & Audio: The video TC ruler shows in pink and the audio TC ruler shows in blue below.
- Zoom In and Out Buttons: You can zoom in and out of the waveform with the + and – buttons .
- Amplify Slider: With the slider on the right you can amplify the height of the waveform.
You can drag the playhead around with the mouse to change the inspected area.
Slipping of External Audio Tracks
External audio clips that have been synced via TC can easily be slipped frame-wise to each side to alter their position relatively to the video clip. The slipping position is stored in timecode format in the “Audio TC Offsets” field, viewable in the General Info, and describes the offset of the audio clip from its sync position (sync position: where the audio timecode equals the video timecode).
Indication I in fig. 9 shows the buttons that can be used to slip the audio one frame to the left or right proportional to the video track. This will basically alter the “Audio TC Offset” (see V in fig. 9) for the external audio clip. The “Audio TC Offsets” are also available in the “Edit” section of the General Info and can be exported to reports and as metadata for source video clips and transcoded clips.
Transfer Offsets to Other Timecode-Synced Clips
To apply an Audio TC Offset to other clips go to the gear menu on the right of the audio header bar (see II in fig. 9) and from the menu (see fig. 10) select “Apply Offset to All Timecode-Synced Clips (Entire Bin)” to apply the offset to all clips in the bin or select “Apply Offset to All Timecode-Synced Clips (Selected Clips)” to apply it to a selection of clips.
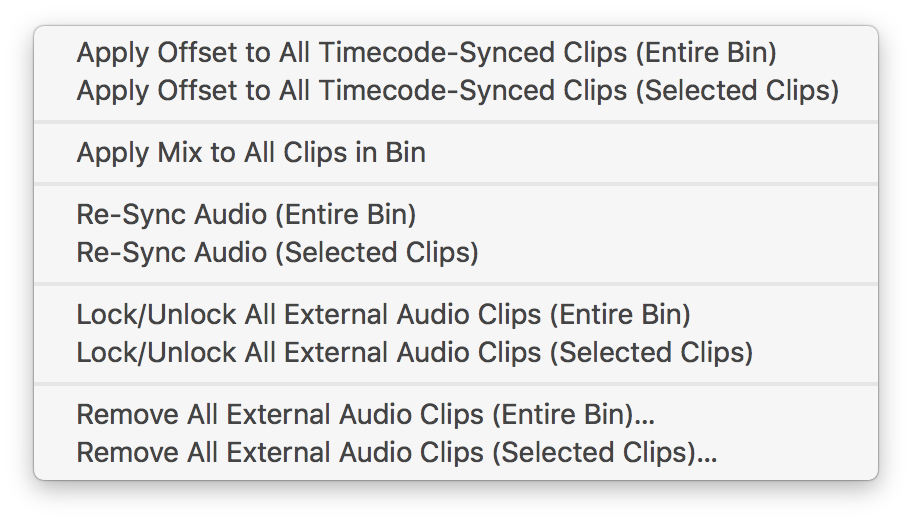
Fig. 10: The audio panel gear menu
Re-Sync External Audio
Timecode-synced external audio clips can easily be re-synced again by selecting “Re-Sync Audio (Entire Bin)” or “Re-Sync Audio (Selected Clips)” from the gear menu opening from the button indicated in II in fig. 9 and shown in fig. 10.
This functionality will basically reset the Audio TC Offset that has been applied with the slipping procedure described above.
Single timecode-synced external audio clips can also be re-synced from the gear menu of the external audio clip:
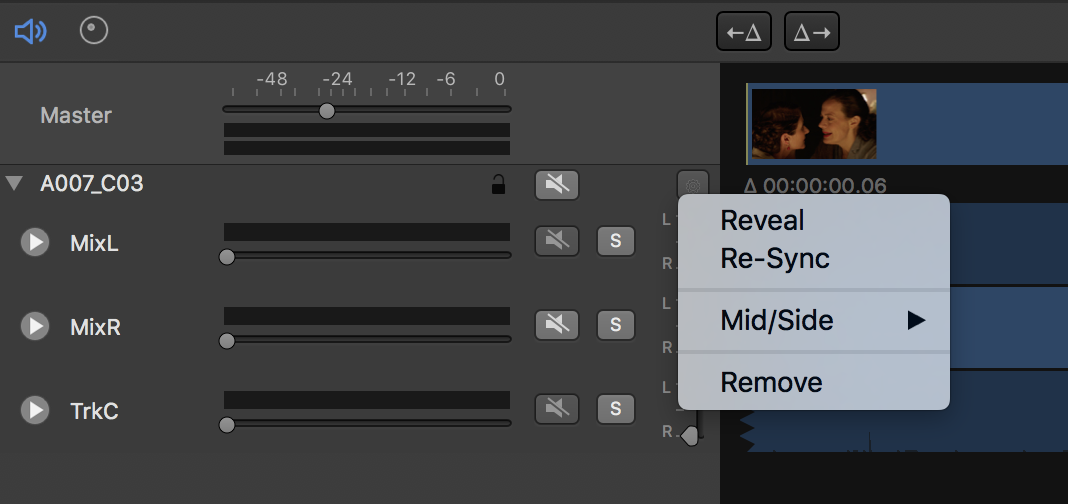
Fig. 11: The gear menu for a single external audio clip
Lock/Unlock External Audio Clips
You can lock and unlock external audio clips of a selection of clips or for all clips in a bin by selecting “Lock/Unlock All External Audio Clips (Entire Bin)” or “Lock/Unlock All External Audio Clips (Selected Clips)” in the gear menu (see fig. 10).
The locking prevents the following actions:
- Removal of external audio clips
- Slipping of external audio clips
- Application of Audio TC Offsets
- Re-Sync of timecode-synced external audio clips
- Application of a mix
To lock a single external audio clip you can click the lock icon that also indicates the locking status of the audio clip (see also III in fig. 9):
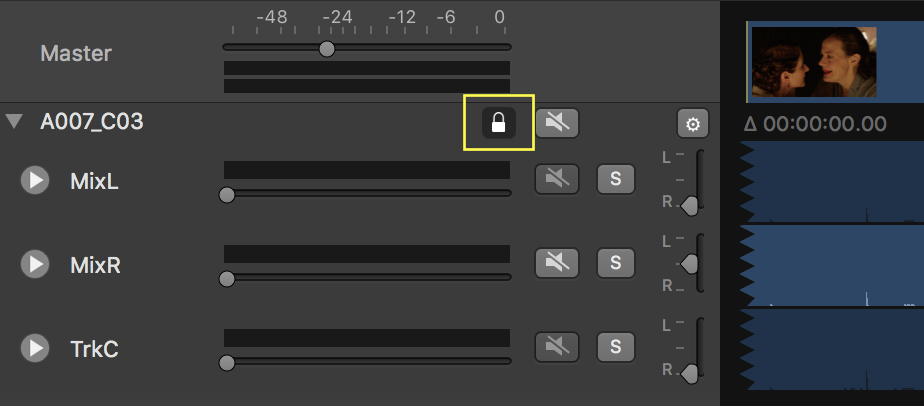
Fig. 12: A locked external audio clip
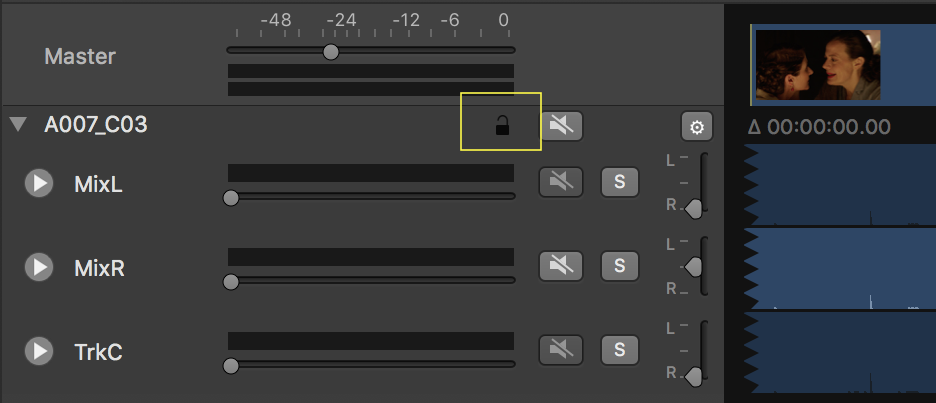
Fig. 13: An unlocked external audio clip
Apply Mix to All Clips in Bin
To apply the mix for the current clip to all video clips in the bin select “Apply Mix to All Clips in Bin” from the gear menu (see II in fig.9 and fig. 10). The mix consists of
- Channel volume
- Channel mute setting
- Channel routing
The transmission of the settings bases on the audio track names. That means that the audio settings will be taken over to channels with the same name in other audio clips.
Remove External Audio Clips
You can remove external audio clips from an entire bin of video clips or from selected video clips by selecting the entries “Remove All External Audio Clips (Entire Bin)” or “Remove All External Audio Clips (Selected Clips)” (see fig.10).
Single external audio clips can be removed by clicking on the gear menu in the header bar of the external audio clip (see IV in fig. 9 and fig. 11).
Additional Functionality
Additional functionality for the external audio clips involves (see fig. 11):
- Reveal: Reveals the audio clip in its audio bin.
- Mid/Side: Select the channels that should be used for mid/side stereophony.
Timecode-Synced vs. Manually Synced External Audio Clips
Silverstack Lab generally differs between a sync by TC and a manual sync via slate positions. While you can slip both types of external audio with the slip buttons (see I, fig.9) some functionality is not available for manually synced clips like e.g. applying a Audio TC Offset of a manually synced audio clip to other audio clips.
When an external audio clip has been synced via timecode you can easily transition to a manual sync via slate markers that can be set in the audio track popover. To return to an automatic sync just re-sync the audio clip as described above (see fig. 10 or fig. 11).
Learn more about manual audio sync in the article How to Manually Sync Audio in Silverstack XT and Silverstack Lab and more about Audio Clips in Silverstack here.
Audible Frame Stepping
When stepping through a video clip with audio frame by frame with the arrow keys you will be able to hear audio for every frame.
To deactivate audible frame stepping go to the “Playback” menu in the Main Menu and deselect “Audible Frame Stepping”
Adding Audio Clips Manually that Qualify for Timecode Sync
If you add audio clips manually that have timecode in common with the current video clip you have the option to sync them automatically by timecode:

Fig. 14: Add an external audio clip manually and sync it by TC
You can either choose to sync the audio clip based on TC or leave the checkbox empty to sync based on slate positions in the audio and video clip.
Tags: audio details, waveform zoom, slip audio, adjust audio, zoom audio