This article covers features which are only available in Livegrade Studio.
Note: This is documentation for features available with Livegrade Studio 6.x or newer and the PomfortVL plugin for Unreal Engine version 5.1 or newer. Latest downloads for the PomfortVL plugin can be found on the virtual production workflow page.
The Pomfort Virtual LUT Box for Unreal Engine allows creatives to interact with the Unreal Engine’s image through Livegrade Studio. It is intended to provide the typical behavior (for example, ASC-CDL in working color space ACEScct) and known tools (standard grading controls and color wheel controllers) for creative color adjustments in virtual production environments. While being color managed in itself, the color adjustments of the Pomfort Virtual LUT Box should be used for creative adjustments of the image only and are not intended to be used for calibration efforts or other color management tasks.
The Pomfort Virtual LUT Box for Unreal Engine consists of two parts:
- Plugin, components, and assets for Unreal Editor include the PomfortVL plugin, a custom actor component, several shaders and materials, and example actor blueprints for Unreal Editor that perform the color manipulations in Unreal Engine.
- Device support in Livegrade Studio for controlling the Pomfort virtual LUT box from the grade controls in LiveGrade Studio.

Unreal Engine Viewport with active Pomfort Virtual LUT Box
The Pomfort Virtual LUT Box is intended to be used to apply a shader to the entire scene (as a post process material), or to individual frustums, for example, in an nDisplay setup. That way the appearance of a scene on certain parts of the LED wall can be changed interactively from Livegrade Studio. The example blueprints’ shaders are configured to apply an ASC-CDL color filter in the working color space ACEScct and can be easily modified to individual project setups.
Installing the Pomfort Virtual LUT Box Plugin with the Example Assets (Shaders and Blueprints)
- Unzip the download for the Pomfort Virtual LUT Box. It contains the plugin as well as the assets.
- Move the folder for the plugin (“PomfortVL”) to the “Plugins” folder of your project. You might need to create a folder “Plugins” in the root directory of your project if it doesn’t exist.
PomfortVL Plugin:
After restarting Unreal Editor make sure you see the “PomfortVL” plugin installed in the plugin overview (via “Plugins” in the “Edit” menu). If the Unreal Editor shows a message that the plugin needs to be recompiled, do so. The source of the plugin is contained in the plugin’s folder.
Note: Using the plugin with a newer Unreal Engine version may require re-compilation of the plugin (you are prompted to do so when opening a project with the plugin for the first time in the new Unreal version). All necessary source code is part of the plugin download. Visual Studio including Desktop Development with C++ and the .NET SDK needs to be installed to compile plugins.
PomfortVL Plugin
Plugin Assets:
Make also sure the plugin’s assets are visible in the Content Browser in Unreal Editor. The assets are located in the plugin’s Content folder and don’t need to be installed separately, but may not be shown by default in the Content Browser.
- Enable plugin assets to be shown in the Content Browser to see the plugin’s assets:
- Click on the “View Options” button of the Content Browser
- Make sure the “Show Plugin Content” option is checked
- To navigate to the plugin’s assets, click on the folder icon in the title bar of the Content Browser and choose “PomfortVL Content”.

Displaying assets of the Pomfort Virtual LUT Box in the Content Browser
Basic Setup
Follow the steps below to get started with the virtual LUT Box:
Unreal Editor:
- Set the “MPCInnerFrustum-PostShader-CDL-OCIO” material as a Post Process Material in your scene.

Set post process material in Unreal Editor
- Navigate to the PomfortVL plugin’s assets in the Content Browser.
- Drag the “LGVL-InnerFrustumMPC-CDL-Actor” into your scene. The ChannelName of the LivegradeVLComponent for that actor is “innerfrustum”.

LivegradeVL actor component with channel name
Note: The look of CDL-based actors is applied in “play”-mode and also in Editor (“non-play” mode). LUT-based actors are only active in the scene rendering when the scene is in “play”-mode.
Livegrade Studio:
- Set up a new slot and switch the grading mode to “ACES CDL”.
- Add the “PomfortVL for UE” virtual LUT box device to the slot (for example, in the device manager). Enter
- the IP address of the machine running Unreal Editor,
- the ChannelName value of the LGVL-InnerFrustumMPC-CDL-Actor that you plan to control (for example, “innerfrustum” for the example above), and
- the Channel Mode to “CDL”.

Connect to a workstation with Unreal Editor
- [OPTIONAL] Set the IDT to “Academy – Reverse sRGB 100 nits (ODT)” and the ODT to “sRGB – sRGB 100 nits (dim)”. With these settings, an ungraded/neutral reference still in sRGB (for example a hires screenshot from Unreal Engine) can be used in Livegrade Studio for preview. With the correct color pipelines set up, Livegrade’s viewer should reproduce the same image as the Unreal Engine with the PomfortVL plugin.
You now should be able to control the look of the scene by changing the CDL controls/color wheels of the configured slot from that Livegrade. The Output Log in Unreal Editor shows one line per change of CDL values (see screenshot below).
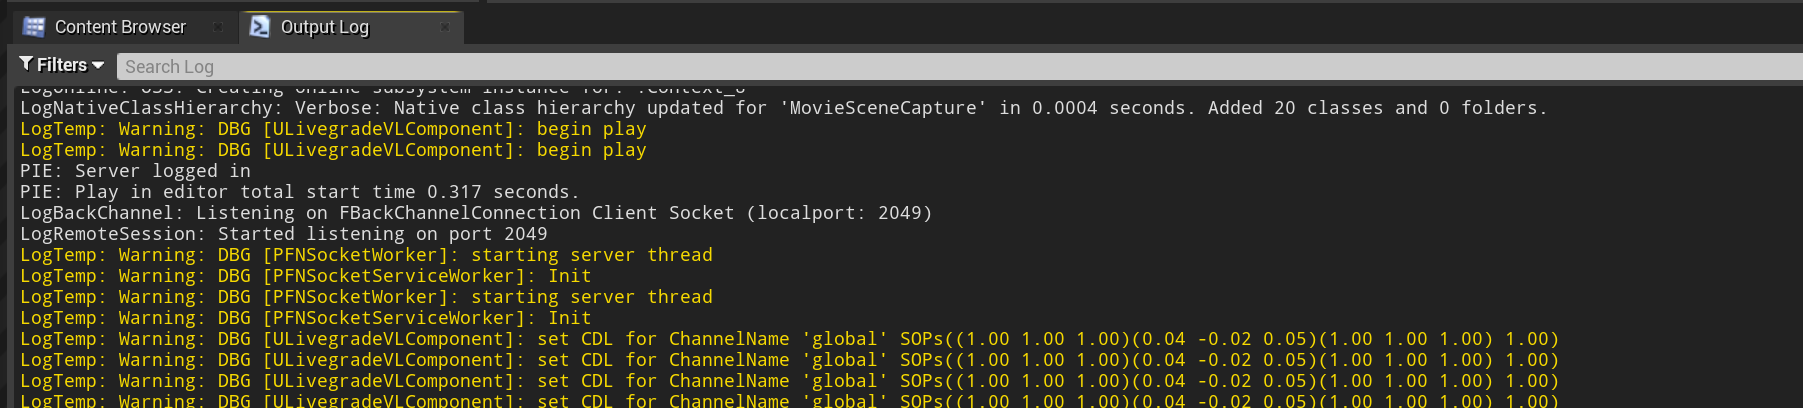
Example Output Log of the Pomfort Virtual LUT Box
Channel Mode:
A connection between Livegrade and Unreal Engine is made either using CDL parameters or a 3D LUT for communicating look information. Depending on this setting, Livegrade prepares information differently:
- CDL: Livegrade only sends the parameters of the CDL grading nodes, no matter what additional nodes or IDT/ODT nodes are set.
- LUT: Livegrade combines all grading nodes into a 3D LUT, except IDT and ODT nodes. It is always assumed (and implemented in the example Blueprints), that the working color space is set up in the shaders and materials in Unreal Engine.
Persistence of Look Information in the Unreal Engine Project:
CDL and LUT values are stored in the project so that the last look can be recalled even if no Livegrade is connected. The information is stored in the PomfortVL plugin’s folder named “SaveState”.
As soon as Livegrade connects again, the current values from Livegrade are applied.
Assets of the “Pomfort Virtual LUT Box” in Unreal Editor
The Pomfort virtual LUT box for Unreal Engine comes with the following assets and components:
MPCs (Material Parameter Collections), in Materials/:
The MPCs act as an intermediate storage of look metadata between the PomfortVL plugin (through the actor components) and the post process materials.
- Frustum_Global_MPC, Frustum_Inner_MPC, Frustum_Outer_MPC: Material parameter collections for the individual actors/materials.
The mechanism to connect post process materials to parameters from the PomfortVL plugin through MPCs enables instantiation of multiple, independent materials to be controlled from Livegrade Studio, e.g. for different frustums (the different materials are bound to independent MPCs, which get their updates from independent PomfortVL instances/actor components, which can be controlled from different connections/channel names from Livegrade Studio).
Note: MPCs can only store parameter values, not textures. That’s why the MPC mechanism can only be used with CDL-based looks, but not for LUTs-based looks.
Main Actor Components:
- LGVL-GlobalMPC-CDL-Actor, LGVL-InnerFrustumMPC-CDL-Actor, LGVL-OuterFrustumMPC-CDL-Actor: An example actor that updates a certain MPC with a CDL values. The actor uses an instance of the LivegradeVLComponent (e.g., ChannelName “innerfrustum”) to provide remote access to the color grade parameters (CDL parameters).
Actor components from previous versions of the PomfortVL plugins:
- LGVL-GlobalCDLGrade-Actor: An example actor setting up a dynamic material with a CDL shader as a post-process material. The actor uses an instance of the LivegradeVLComponent (ChannelName “global-cdl”) to provide remote access to the color grade parameters (CDL parameters).
- LGVL-GlobalLUTGrade-Actor: An example actor setting up a dynamic material with a 3D LUT shader as a post-process material. The actor uses an instance of the LivegradeVLComponent (ChannelName “global-lut”) to provide remote access to the color grade parameters (dynamic 3D LUT texture).
You can set the identifier in the detail section “Live Grading” as the “ChannelName” property (see screenshot).
Note: Multiple instances of LivegradeVL Component must have different/unique values for ChannelName. Identical values for ChannelNames will lead to undefined behavior.
Other Actor Components and Assets:
- LGVL-CylinderCDLGrade-Actor: An example actor setting up a dynamic material with a CDL shader as a surface material for a cylinder object. The actor uses an instance of the LivegradeVLComponent (ChannelName “cylinder-cdl”) to provide remote access to the color grade parameters (CDL parameters).
- LGVL-CylinderLUTGrade-Actor: An example actor setting up a dynamic material with a 3D LUT shader as a surface material for a cylinder object. The actor uses an instance of the LivegradeVLComponent (ChannelName “cylinder-lut”) to provide remote access to the color grade parameters (dynamic 3D LUT texture).
- LGVL-GlobalCDL+InvGradeActor: An example actor setting up a dynamic material with two CDL shaders as a post-process material. The actor uses two instances of the LivegradeVLComponent (ChannelNames “global-cdl” and “global-invcdl”) to provide remote access to the color grade parameters (CDL parameters). See Setting up PomfortVL for Foreground Grading for use cases.
- LGVL_EditorTick_BPI and LGVL_EditorTicker_BP: Blueprints with functionality for triggering updates of CDL-based post process materials also in non-“play” mode.
These assets illustrate the basic functionality and interaction of the virtual LUT box, can be used as a starting point for your own integration development.
Color Management and Grading Shaders:
- MPCGlobal-PostShader-CDL-OCIO, MPCInnerFrustum-PostShader-CDL-OCIO, MPCOuterFrustum-PostShader-CDL-OCIO: Post-process shaders bound to corresponding MPC objects, to be instantiated manually
Grading shaders from previous versions of the PomfortVL plugins:
- CDLPostShader-sRGB and CDLPostShader-Rec2020PQ: Post-process shaders used to color grade the entire scene. A CDL is applied in working color space ACEScct. The blendable location is set to “After Tonemapping” and the shader is built for tone mappers to sRGB and PQ (with Rec.2020). The shader CDLPostShader-sRGB is used by default by the LGVL-GlobalCDLGrade-Actor.
- LUTPostShader-sRGB: Post-process shaders used to color grade the entire scene. A 3D LUT is applied in working color space ACEScct. The blendable location is set to “After Tonemapping” and the shader is built for tone mappers to sRGB.
- CDLPostShader-OCIO: A post-process shader used to color grade the entire scene. A CDL is applied in working color space ACEScct. The blendable location is set to “Before Tonemapping” and the shader is built for OCIO-based ACES processing in the viewport. The shader assumes the color space of the engine’s rendering to be sRGB with linear enoding.
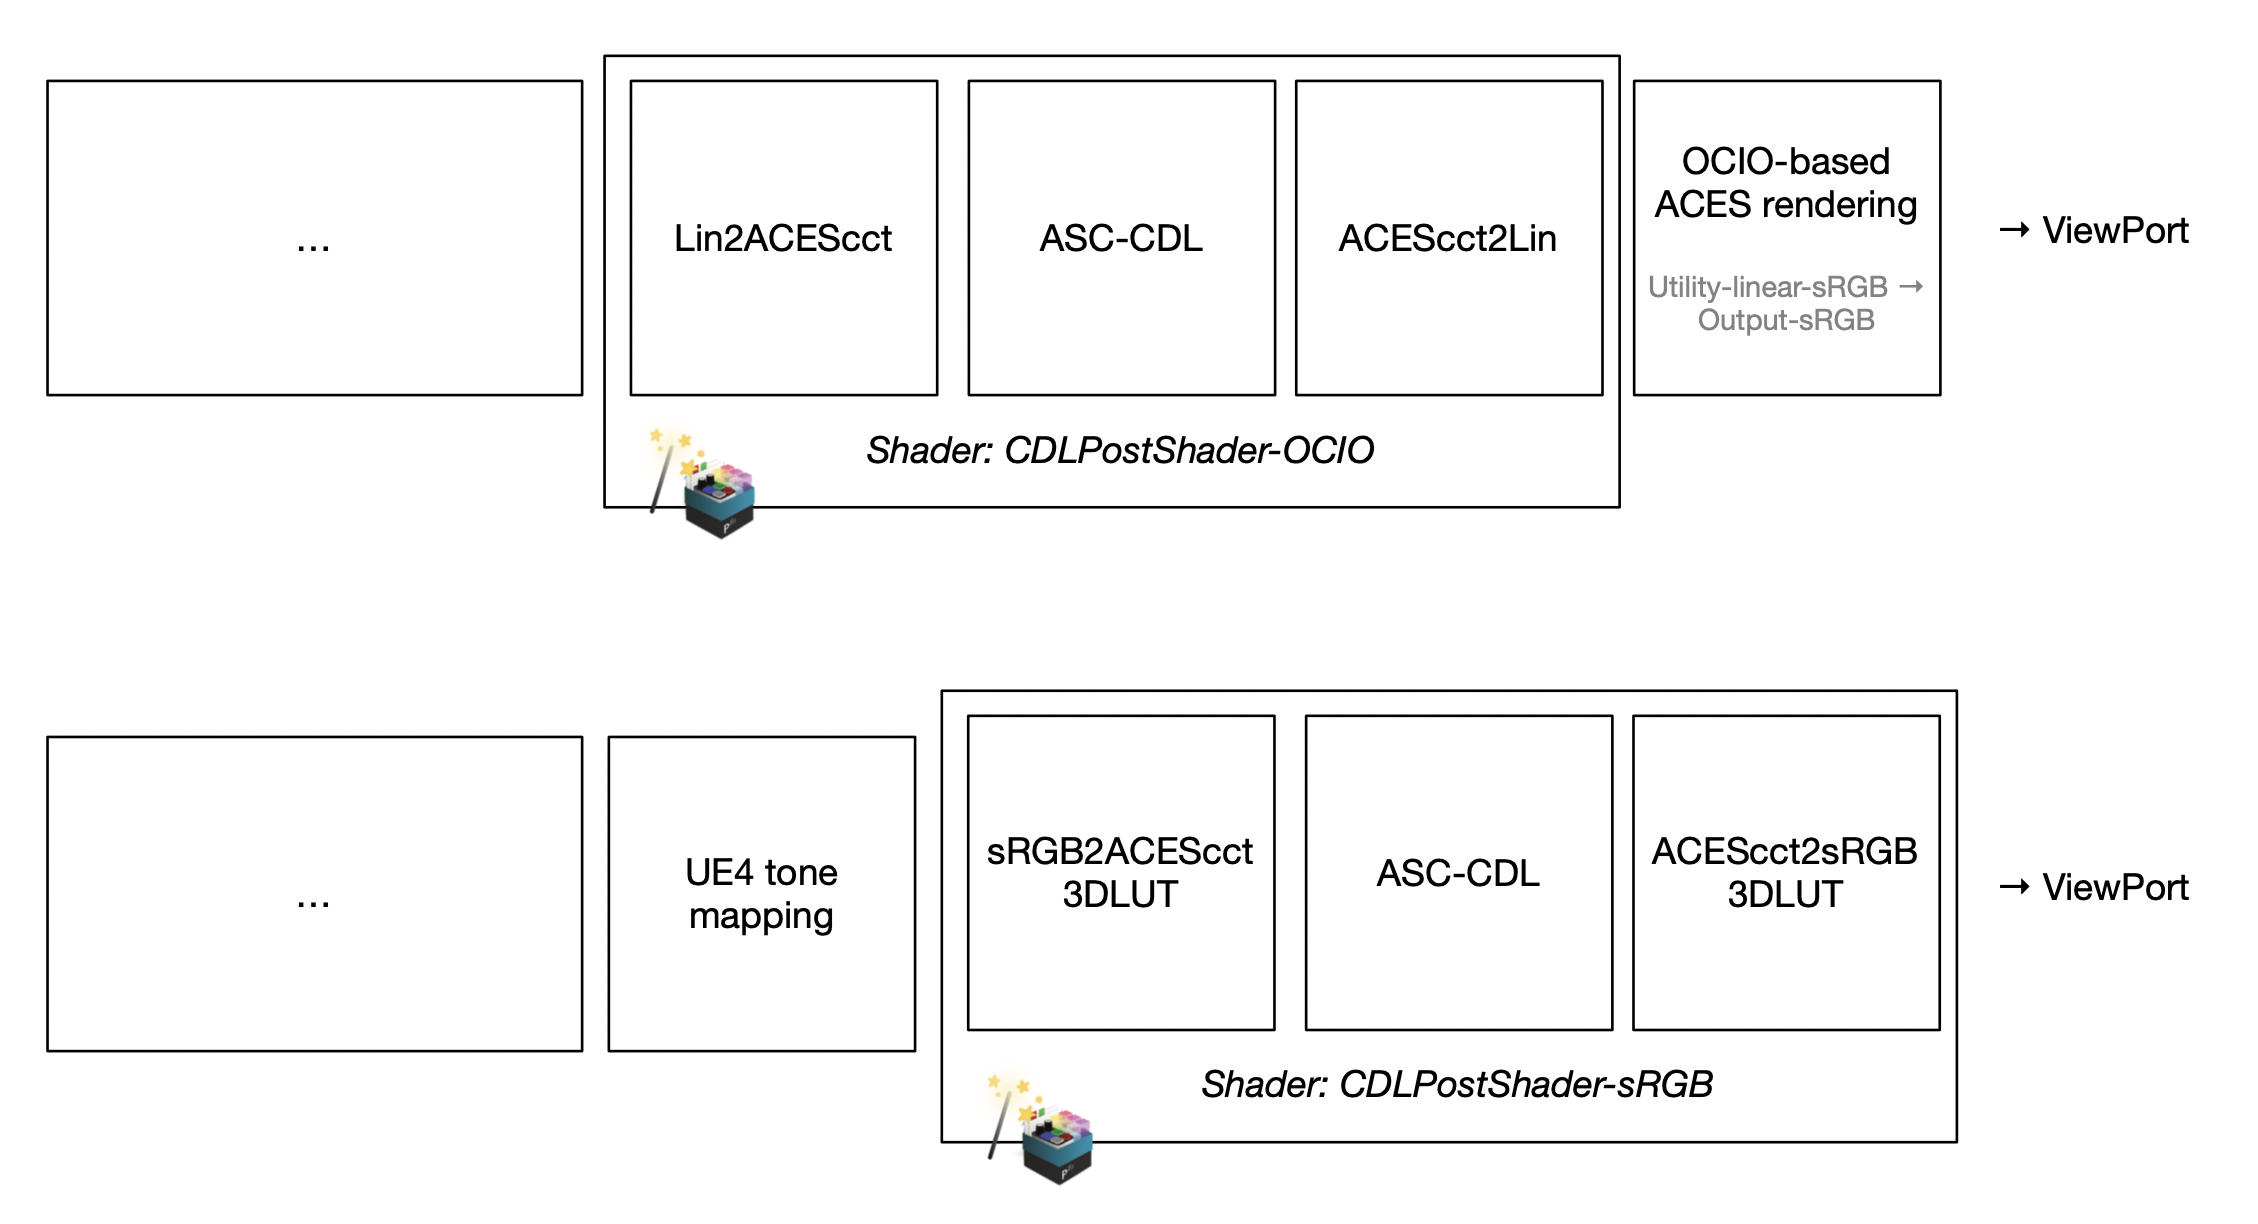
Color pipeline in Unreal Engine with PomfortVL shaders
- CDLSurfaceShader: A surface shader used to color grade the emissive color of a material. A CDL is applied in working color space ACEScct. The shader is used by default by the LGVL-CylinderCDLGrade-Actor.
- LUTSurfaceShader: A surface shader used to color grade the emissive color of a material. A 3D LUT is applied in working color space ACEScct. The shader is used by default by the LGVL-CylinderLUTGrade-Actor.
Other Setup Options
Bottom Color Bars
The color bars on the bottom of the image can be used to quickly indicate if a grade is applied. This is especially helpful when setting up the Pomfort Virtual LUT Box.
If the color bar has only one row, no grade is applied. If the color bar is split into two rows (a neutral on the bottom and a modified row above), a grade is applied.
You can modify or bypass the ramps in each shader asset by manipulating the “Patch-Ramp” nodes in the Material assets. The neutral and the graded color bar are created by one “Patch-Ramp” node each.
- You can change the height of both bars by changing the yStart parameter of each PatchRamp node. yStart is a value from 0.0 to 1.0 spanning the y axis from top (0.0) to bottom (1.0). The color bar is painted from yStart to the bottom of the image.
- You can disable the color bar by bypassing the “Patch-Ramp” nodes (i.e. connecting the output of the previous node directly with the input of the next node).
You can explore the blueprints and shaders for more options.
Trouble Shooting
If you start the Unreal Engine after you configured the devices in Livegrade Studio, you can click the “Reload devices” button beside the “Devices…” button in the main window to reconnect to the PomfortVL plugin. A yellow warning triangle in the slot UI can indicate that the slot is not in Play mode.
Known Issues
- Amount of logging in Output Log cannot be configured yet.
- Multi-processing is not supported yet
- LUTs used in CDLPostShader-sRGB and CDLPostShader-Rec2020PQ currently only for tone mapping to sRGB and PQ (with Rec.2020) output color space. In case you are using the tone mapping to other output color spaces, different LUTs need to be used. Please contact us at virtualproduction@pomfort.com.