The main screen of Livegrade contains all primary controls for operating the software. You switch between devices, control the look of live signals, work with stored looks, and add entries to the shot library.
A lot of the controls have tooltips, that further describe what the control is doing. Tooltips are shown when you move the mouse over a control without clicking it.
Some elements offer a context menu when right-clicking, for example shot entries in the shot library, the current image in slots, or look presets in the look library. These context menus offer additional options for the right-clicked element.
Most of the actions triggered from controls in the main window can also be found in the main menu and can be triggered by keyboard shortcuts. The keyboard shortcuts are designed for quick interaction with the application, and can be customized to your specific needs.
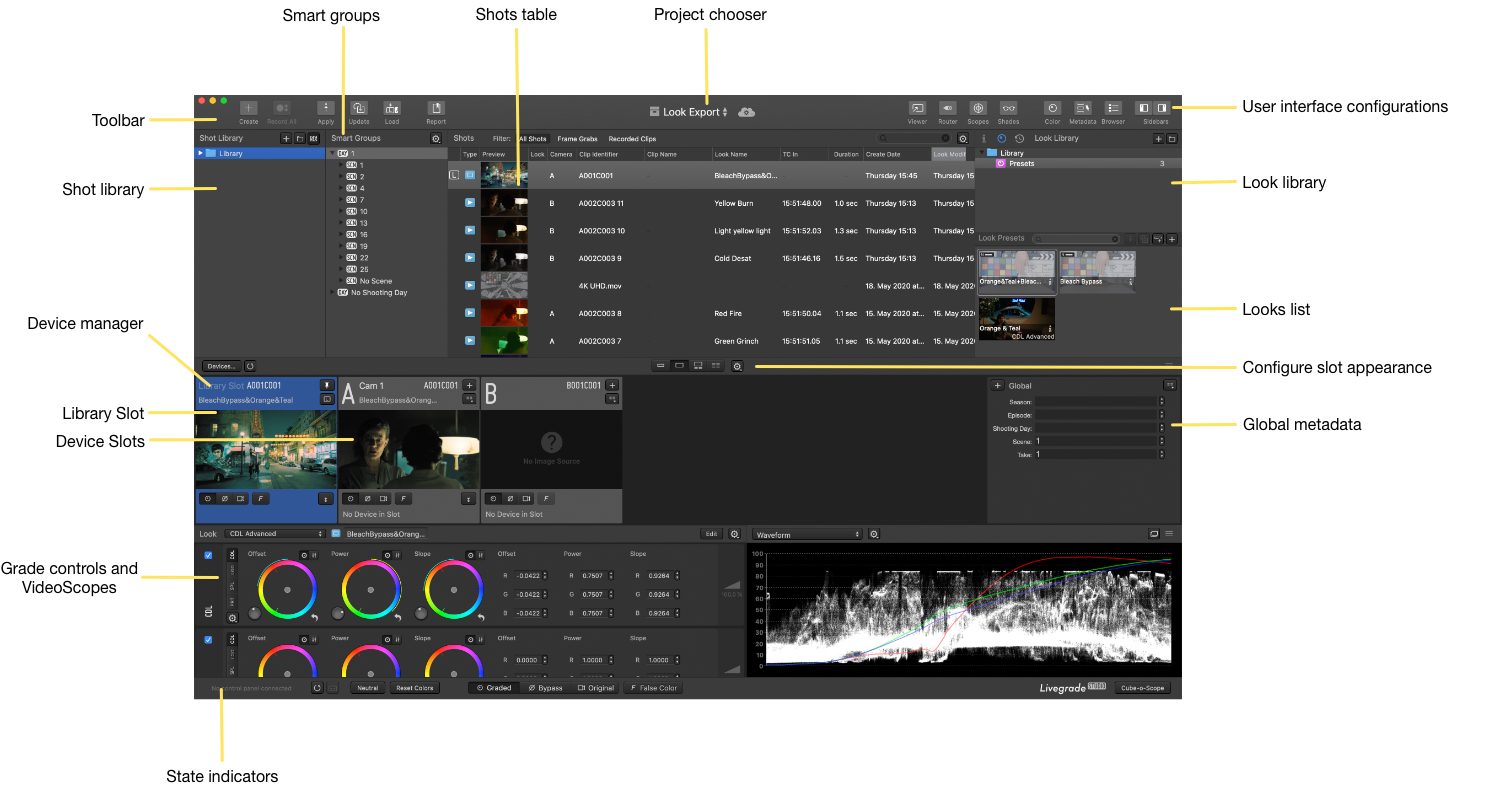
Livegrade’s main screen (click to enlarge)
Shot library:
The shot library stores snapshots of the look settings and the settings of attached devices such as cameras. Over the course of a project the shot library grows to a detailed camera log and acts as a reference database for the camera department.
New shot entries can be created in various ways and detail. For some projects where camera settings and the set and lighting is not changing often throughout the day, you may want to only create a few shot entries, in projects with complex setup changes and varying camera and lighting conditions, a regular creation of shots is necessary to create all needed records for covering the shooting day.
Shots always reside in bins, and bins can be grouped in folders. Folders and bins can be used to give your project a logical structure by for example grouping shots in shooting days, cameras, units, or scenes.
You can create bins and folders with the corresponding buttons above the shot library. Drag and drop bins for grouping bins in folders or reordering bins and folders.
Right-click on a bin or folder in the shot library for more options.
Smart groups:
There is an advanced “Smart Groups” view accessible from the shot library window, that displays a hierarchical structured outline of the currently selected folder level of the shot library. Smart groups are auto-generated based on shot metadata. You can define the hierarchy levels for the outline in a gear menu, that provides the metadata fields “Season”, “Episode”, “Flagged”, “Label”, “Crew Unit”, “Shooting Day”, “Scene”, “Shot”, “Take”, “Camera”, “Caption”, “Location” and “Rating” to choose from. You can also apply from predefined layouts or save custom layouts.
Note: Smart groups are pre-filtered by the selected folder/bin in the shot library sidebar. When you want to view all available items in the library, make sure to select the “Library” home folder in the shot library sidebar.
Shots table:
The shots table displays the shot entries of the currently selected bin or folder in the shot library.
A shot can contain various metadata fields shown in columns. Fields for metadata include color correction metadata from the grade controls, timecode information and clip names, slate information such as scene and take, camera settings, manual comments and notes, and a preview image if available. You can edit most of the metadata by clicking or double clicking the metadata field in the table.
You can change the list shown columns with the gear menu on top of the shots table. You can reorder the table columns by dragging them.
You can sort by a metadata filed by clicking on the header of a column.
You can set the row height in the shots table by changing “Shot Thumbnail Size” in the “View” menu.
You can choose to only view shots with framegrabs or recorded clips by choosing the filter buttons above the shot list. You can search for specific shots in the currently displayed list of shots with the search field.
Right-click on the row of a shot for more options.
Toolbar:
The toolbar contains important controls for main tasks in Livegrade, including actions to manage shots, to create a shot report from the shot library, to open the image viewer, and to configure the user interface.
The toolbar offers specific access to the important actions to create new shots in the shot library (including creating framegrabs and recording clips), apply the look of a stored shot on the current slot, update existing shots, and load shots into the library slot for reference.
The “Shades” button dims the entire main window. This can be useful when working in very dark studio environments. You can set the level of dimming in the preferences.
Look library:
In the look library you can store specific settings of the grade controls for later use as “look presets” and “node presets”.
Look presets contain the settings for a full set of grade settings and a preview image, if available. Examples for look presets are the show looks (a hand full of looks predefined by a colorist or prepared in pre-production), or specific looks that my be reused regularly for certain setups.
Node presets only contain settings of a single or a few grade nodes. Node presets are specific, single transforms that are applied to already created looks. Examples are ASC-CDL adjustments for a certain lens or filter that shall be applied on a live signal in addition to the creative look, or a pre-LUT that needs to be applied to the signals of a specific camera.
The look and node presets are stored in bins, bins can be grouped in folders. You can create bins and folders with the corresponding buttons above the look library. Drag and drop bins for grouping bins in folders or reordering bins and folders.
Right-click on a bin or folder in the look library for more options.
Note: The right panel with the look library has different tabs. To display the look library switch to the “Look Library” tab, or choose the “Color” user interface configuration.
Looks list:
The looks list displays look presets and node presets of the currently selected bin or folder in the look library. The presets are created with settings from the grade controls of the currently displayed slot by clicking the corresponding “+” button. Double click a preset to apply it to the grade controls of the current slot.
You can also create a look from a stored shot by dragging the shot from the shots table to the looks list.
You can update presets with the buttons above the looks list. Drag the thumbnail icon of a preset to move it into another bin. You can search for text in the currently displayed list of presets with the search field.
You can lock shots in order to prevent updating them. Choose “Lock Selected Shots” from the “Library” menu.
Right-click on a thumbnail icon of a preset for more options.
Project chooser:
With the project chooser you can switch projects. Each project has its own shot and look library.
User interface configurations:
In Livegrade you can manually adjust the user interface to your needs, e.g. by resizing panels, switching tabs, and hiding and showing user interface elements.
Additionally you can also switch to a certain configuration in the toolbar of the user interface (UI), that is targeted for a particular task. Available UI configurations are:
- Color: This UI configuration puts the color correction and adjusting of looks into the main focus of the application’s user interface
- Metadata: This UI configuration puts monitoring metadata received from live signals and devices in the main focus.
- Browser: This UI configuration puts browsing and inspecting stored shots and their metadata in the main focus.
Device slots:
Slots contain controls and metadata for independent hardware systems. Each slot can represent one camera in multi-camera setups for example. You can imagine slots as independent tabs of a web browser – changes in one slot don’t affect the state of other slots.
Slots are automatically assigned characters, starting with “A” for the first device slot. Additionally you can add a slot label to describe their function or contained devices.
You can also use a custom character (A-Z) for as slot character.
Each slot has a configured set of hardware devices attached. The slot user interface shows a short list of configured devices and indicators that display connection issues.
You can quickly add a device to the current slot by choosing “Add device” from the “Slots” menu.
Some devices are capable of offering either framegrabs or live image. The current image is shown in the slot user interface. Livegrade also can display this image in a separate viewer window.
For each slot you can maintain a set of metadata.This metadata is then stored in the shot library whenever you create a new shot entry from that slot. Metadata can be edited manually (such as information about used filters), or automatically updated from the attached devices (such as camera settings).
You can create a shot entry in the shot library with the information from current slot by clicking the “+” button in the slot user interface of each slot.
Slots consist of the slot user interface, as well as the grade controls and the video scopes below, e.g. for controlling and inspecting the look of a slot. You can change the height of the slot and its controls by dragging the bar above the slot.
Device Manager:
The configuration of devices and slots is done in the device manager. Open the device manager with “Devices…” button above the slot bar or by choosing “Manage Devices…” from the “Slots” menu.
Global metadata:
While the device slots display metadata that is specific to the slot’s devices, the global slot allows you to see and edit metadata that is valid for all device slots. These are slate information with scene and take fields, production information such as episode and unit, and time and date information. This information is stored together with the slot specific metadata to the shot library with every new shot created for any slot.
You can create new shots for every slot by clicking the “+” button in the global slot. You can configure the shown metadata field with the options menu button above the global metadata.
Note: In the slots appearance “Tabs Only” the global slot is not visible. Switch to another slot appearance or to the metadata user configuration to see the global metadata slot.
Configure slot appearance:
The slot user interface can have different appearances. You can change between appearances with or without a live image, metadata, and primary controls, and choose different height and size settings.
Library slot:
The library slot is a special slot that cannot contain devices. You can use it to inspect shots form the shot library, and for example for permanently outputting a shot’s framegrab on HD-SDI for reference.
You load a shot into the library slot by clicking the “Load” button from the toolbar, choose “Load in Library Slot” from the “Library” menu, or use the context menu of the shot table.
Note: The library slot is not shown by default. You can show and hide it by choosing “Show Library Slot” from the “View” menu.
The library slot has two option buttons that influence the behavior of selecting shots and slots together with the library slot:
- “Fix HD-SDI output to this slot” (pin button): When enabled, the viewer window and the HD-SDI output always show then content of the library slot – also when another slot is selected. This option can be used to permanently show a reference image from the library slot to HD-SDI output, e.g. in order to compare the live image to this reference image in side-by-side mode of a HD-SDI monitor. When disabled (default behavior), the viewer and HD-SDI output always show the image of the currently selected shot.
- “Load the currently selected shot in the library slot” (“L” button): When enabled, the library slot always loads the selected shot in the shot library. This allows quick browsing of shots and immediately seeing them on the HD-SDI output or viewer. When disabled (default behavior), you need to manually load an image
State indicators:
State indicators display the state of three device categories:
- Status of attached hardware control panels (such as Tangent panels),
- status of the video output device, and
- status and activity indication for automation events and actions.