Silverstack comes with advanced camera support for ARRIRAW. This means that Silverstack provides advanced features for this format that maximize the efficiency of relevant on-set tasks such as quality check, playback and metadata management. Now, for ARRIRAW you also will be able to:
- read all metadata from sequences, therefore use smart folders and path wildcards
- playback ARRIRAW natively in Silverstack
- apply image transformations like anamorphic de-squeezing, flipping and LogC to rec.709 conversion
- transcode your sequences to ProRes or H.264 clips
All the existing features (which already work with Generic copy), such as fast checksum verification backups to multiple destinations and helpful clip reports for production documentation are still available for ARRIRAW.
This article is meant to be a basic guide for the ARRIRAW workflow with Silverstack. With the large amounts of data generated in a ARRIRAW production, a reliable data management tool is essential to reduce time, and thus reducing costs. Furthermore, with the MHL checksum verification feature, you can be sure that all files on the camera storage are the same as the ones in your multiple backups.
1- Offloading
Once your precious footage is recorded, the first thing you want to do is to create backups as soon as possible. The most commonly used storage systems for ARRIRAW are Codex capture drives, which means that you need to work with the Codex transfer stations. The driver installation information can be found here. To set up your Codex User Interface app, please refer to the Knowledge base article Handling ARRIRAW File Sequences.
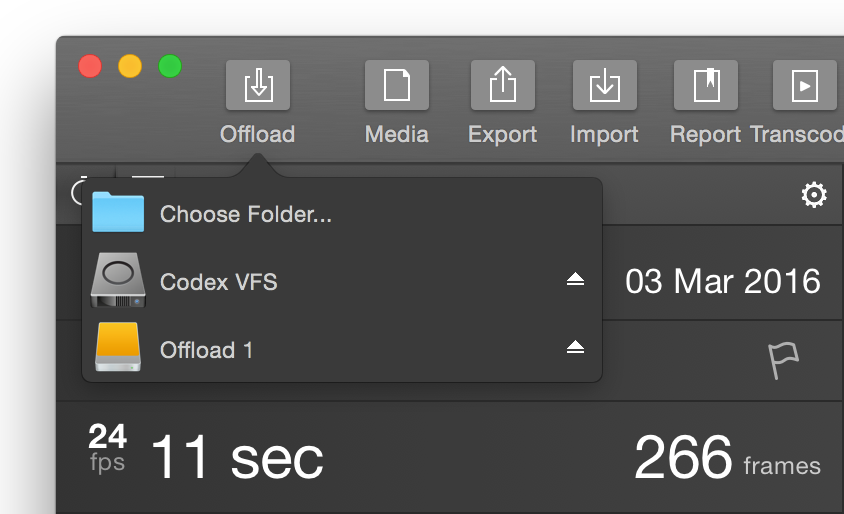
Codex VFX source selection
To shorten the time the capture drives are unavailable for recording, the best way to operate is to copy the footage first to a fast mirrored RAID and from there copy the sequences to an LTFS based volume for archiving. For security reasons, only then it is recommended to erase the capture drives for re-usage. Silverstack will generate a checksum MHL file for every copy process that can be used to compare those against the footage in further processes of the postproduction chain. If you want to learn more about the Offload process, please follow the steps described in the article Offloading Clips.
2- Quality check
Once your footage is offloaded and registered into Silverstack’s Library, you can start checking its quality by natively playing back the sequences. The visual controls features can be very helpful to control exposition and clipping.
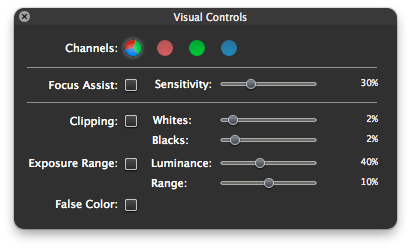
Visual controls in Silverstack
Image transformations can also be applied to the footage to speed up your quality check process. A LogC to Rec.709 color filter is applied by default, but you are able to bypass it if you want. Anamorphic de-squeezing and image flipping can be also applied when needed. You can learn more about this topic in the Image Transformation article.
Comments, labels and ratings can be written as metadata to each clip. Script notes also can be added to this metadata. This kind of information can be very helpful for the editor or VFX facility.
3- Reporting
Shooting Day reports, Clips reports and Volume reports can be generated with Silverstack to inform the production team about the results of the ongoing project. They can also contain helpful metadata created in the Quality Check process which can be very helpful in subsequent postproduction steps. More information in Creating Reports and Customizing Clip Reports.
4- Transcoding
One of the latest Silverstack’s features is the transcoding functionality. Now you are able to export your ARRIRAW sequences into QuickTime ProRes and H.264 clips. This means that the Director can watch the clips on his iPad for evaluation purposes. If image transformations were applied previously, the transcoded clips retain all this modifications.

Transcoding presets
The transcoding functionality is also helpful for the offline editorial process, as Silverstack enables to generate high quality ProRes clips. Simply export selected takes to ProRes 422 to start editing the project.
With the next step you will be able to match all the information with the transcoded clips:
5- Metadata transfer
It’s time to export all the useful information generated by the Script combined with the comments, labels and ratings created while checking the quality. This can be done with the creation of an ALE file matching the file name with the metadata. There are different options that allow you to select what kind of information is included. Now you will be able to match the previously transcoded files with the metadata. This way the editor will have all the information about the takes from every shot to select the best and stream the workflow.
You can learn more in the article Transferring Metadata to Avid Media Composer.
6- Conform
With the implementation of advanced ARRIRAW support, the conform feature becomes more important than ever before. The amount of data in ARRIRAW projects can be massive. Using Silverstack’s conform feature saves a lot of disk space and copy time. With the help of an EDL file Silverstack’s clip library is able to identify and copy only the used material which needs to be and sent e.g. to the VFX facility.
CDL import for conform
After the offline editing process is finished, an EDL (CMX3600 standard) needs to be created. This EDL can be imported into Silverstack, and a new bin automatically will be created. This new bin now contains all the clip references used in the editing process. Simply create a backup of the bin to the disks selected to be sent to the VFX facility. You can read about the details of the process in the article Use Silverstack’s clip library for EDL conform.