Livegrade supports the hardware grading panels Tangent Wave, Tangent Element and Tangent Ripple. This article describes the use with the Tangent Element series and the Tangent Wave in detail. For the use with Tangent Ripple please refer to the section about the Element Tk control panel that works similar to the Ripple.
Sections in this article:
- Connecting Your Tangent Grading Panel
- Preferences For Your Tangent Grading Panel
- Tangent Element (Element Tk, Element Mf, Element Kb, Element Bt)
- Tangent Wave / Wave2
CONNECTING YOUR TANGENT GRADING PANEL
Please follow these steps to get Livegrade up and running with your Tangent panel:
- Connect the Tangent panel to your Mac.
- If you did not installed your Tangent Device Driver yet, then this would be a good moment. You can find on Tangent Support website.
- Start Livegrade.
- Wait until the panel is recognized, indicated by a blue glow at the lower left of the main window.
- You are ready to grade!
PREFERENCES FOR YOUR TANGENT GRADING PANEL
1. Choose “Preferences…” from the “Livegrade” Menu Bar or use the keyboard shortcut “⌘+,”
2. You can customize the level of sensitivity for your panel in the grading preferences under “Hardware Panels” > “Sensitivity”.

figure 1: Grading preferences
Tangent Element
Livegrade allows you to connect hardware grading panels, including the Tangent Element, to precisely and physically manipulate your grades. The Tangent Element offers a variety of controls, ranging from Color Balls, Color Wheels, Command Keys to Precision Knobs. The controls utilized by Livegrade are depicted below.
The “Element Tk” control panel
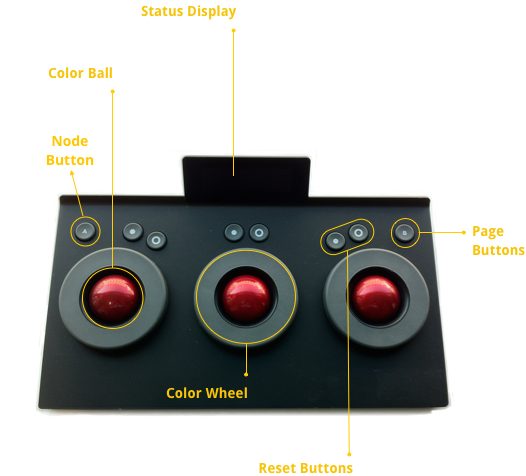
figure 2: “Tangent Element Tk”
- The Page Button allows you to cycle through different configurations of the Color Wheels. Depending on the grading mode and active the page, the wheels/balls control different aspects of your grade.
- The Status Display shows which values can be manipulated using the respective controls.
- The Color Balls manipulate the Hue and Saturation values of their respective color ranges.
- The Color Wheels manipulate the Level value of their respective color range.
- The Ball/Wheel Reset buttons reset the values of the Ball/Wheel right next to it.
- The Node Button «A» lets you switch the panel between the CDL nodes if there are multiple, i.e. in the Freestyle grading mode.
Additionally, Livegrade lets you map different actions for the Element Tk panel using the Tangent Mapper.
The “Element Mf” control panel

figure 3: “Tangent Element Mf”
- The Status Display shows which values can be manipulated using the respective controls.
- The first row Command Keys perform the following commands from left to right:
- New Grade, Update Grade and Apply Selected Grade.
- New Grade: Adds a new grade in your Livegrade Grade Library
- Update Grade: Updates your current adjustments to the selected grade in your library
- Apply Selected Grade: Apply the selection from your Grade Library to your actual grade.
- The second row Command Keys perform the following commands from left to right:
- Bypass Color, Show Original Signal and Enable False Color.
- The third row Command Keys perform the following commands from left to right:
- Set To Neutral, Next Device, Previous Device
The “Element Kb” control panel

figure 4 : ” Example Tangent Kb in CDL Mode”
- The Precision Knobs each (depending on the grading mode) manipulate one specific aspect of your grade, such as ‘Saturation’, ‘Shadows (RGB channels)’, ‘Midtones’, Highlights or in Alexa Mode also the ‘Printer Lights’.
- The Page Buttons allow you to cycle through different configurations of the Precision Knobs. Depending on the Grading Mode, the knobs control different aspects of your grade.
- The Status Display shows the meaning and value of multiple controls. It is split into three rows and three columns. Depending on grading mode the first line is either empty(Alexa Grading Mode) or setup with Saturation. Saturation is on the first page in both grading modes, only one knob is assigned to saturation. The second line displays the meaning and value of the respective Precision Knob above, such as ‘Shad R’ for ‘Shawdows Red’ or ‘Mid R’, standing for ‘Midtones Red’ and so on.
The “Element Bt” control panel

figure 5: “Tangent Element Bt”
The Tangent “Element Bt” panel got the same functionality like the “Element Mf”.
Additionally, you can use the software Tangent Mapper to assign different actions to the buttons on your Tangent panel. These are the actions that can be mapped:
- Apply Look
- Select Look 1 – 6*
- Node Selection
- Select CDL Node 1-2
- Select previous node
- Select next node
- Temperature
- Increase Temperature
- Decrease Temperature
- Tint
- Increase Tint
- Decrease Tint
- SlotSelection
- Select Slot 1-6*
*1-6 means that there are 6 actions the first one applies the first and so on.
TANGENT WAVE / WAVE2
Livegrade allows you to connect hardware grading panels, including the Tangent Wave and the Tangent Wave 2, to precisely and physically manipulate your grades. Tangent Wave panels offer a variety of controls, ranging from Color Balls, Color Wheels, Command Keys to Precision Knobs. The controls utilized by Livegrade are depicted below.
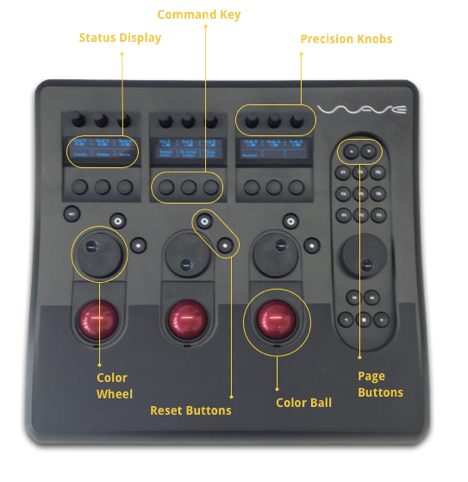
figure 6: “Tangent Wave”
- The Page Buttons allow you to cycle through different configurations of the Precision Knobs. Depending on the page, the knobs control different aspects of your grade.
- The Precision Knobs each manipulate one specific aspect of your grade, such as Offset, Power, Slope for Red, Green and Blue or alternatively (holding ALT button): Saturation, Contrast, Stretch, Warmer and Greener.
- The Status Display shows which values can be manipulated using the respective controls.
- The Command Keys perform the following commands from left to right:
- Standard: New Grade, Update Grade, Apply Selected Grade, Bypass Color, Show Original Signal, Enable False Color, Set To Neutral, Previous Slot and Next Slot
- Alternative (holding ALT button): Create Grade For All Slots, Replace Image of Selected Shot, Update Selected Shot and Replace Image, Create Preset, Update Selected Preset, Apply Selected Preset, Reset Colors, Select Previous Shot, Select Next Shot
- The Color Balls manipulate the Hue and Saturation values of their respective color ranges.
- The Color Wheels manipulate the Level value of their respective color range.
- The Ball/Wheel Reset buttons reset the values of the Ball/Wheel right next to it.
Additionally, the panel can be individually set up to your requirements e.g. if you prefer to use the trackballs for lift, gamma, gain or if you want to store look presets to the F1-9 buttons. You can use the software Tangent Mapper to create your individual control mapping.